For documentation on the current version, please check Knowledge Base.
The equivalent documentation of the latest release can be reviewed here : Measure in Mobile Mapping data.
Measure in Mobile Mapping data - Version 10.5
All Orbit clients able to measure using a point cloud or via triangulation :
- This page describe the mobile mapping measurement functions of the High end Orbit desktop client (standalone or client server)
- If you are using the panorama component via an Orbit Publisher 1), more information can be read here : Panorama Component
If a Point Cloud is available, it is possible to measure with one single click using the Point Cloud.
If no Point Cloud is available, or the cloud is not dense or accurate enough, two panoramas can be used to a measurement based on Triangulation.
It is strongly recommended to read first the general information about View and Use Mobile Mapping data.
Point Cloud vs Triangulation

Measure Units and Coordinate System

Point X,Y,Z measurements are expressed in the MapCanavas coordinate system.
The MapCanvas coordinate system can be set from the MapCanavs Statusbar.
If no vertical CRS is set via the MapCanvas CRS the Z of your mobile mapping resource data will be retained.
Distance, Length, Area or Volume measurements are expressed in metric units calculated in a local projection centered on the current view position. This intelligent technique gives the most accurate metric measure result at all time.
Projected measure results are always displayed in meters.
More information :
Measure Overlay Window
The behavior and sequence of clicking depends the used measure mode and function.
It is strongly recommended to read first the the documentation about
measuring in Point Clouds and by Triangulation.
Position
Measurement of a single position.
 Point Point  Point drop Point drop | A new click is a new measurement. X, Y and Z positions Height (point drop) : Height above the ground. The ground height is calculated by the Z from the photo position minus the Heigt from the camera above the ground. Error (only for triangulation measurements) : Estimated Mean Squared Error (MSE). |
 Point to reference Point to reference | Only available when using point cloud. Click a 1st point to define a reference plane by the point cloud hover. Click a 2nd point to measure XYZ and the perpendicular distance to the defined reference plane. |
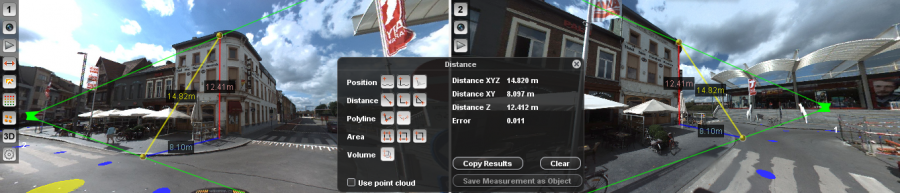
Distance
Measurement of a straight line between 2 points.
 XYZ XYZ  XY and Z XY and Z  XYZ, XY and Z XYZ, XY and Z | Click 2 positions within the same panorama view window. After a 1st click a 1st point indication and a connecting line will guide you to click a 2nd point. The measurement will be finished by the 2nd click. Distance XYZ (Yellow) : 3D length between start and endpoint Distance XY (blue) : 2D length between start and endpoint, length of the projected 3D object with Z = 0 Distance Z (red) : The difference in height between start and endpoint. Error (only for triangulation measurements) : Estimated MSQR error for each measurement. |
Polyline
Measurement of a poly line, between 2 or more points.
 Free Polyline Free Polyline | Measure as a Distance, but keep repeating to click more points. Click 2 or more positions within the same panorama view window. After clicking the 1st point a connecting line will guide you to click the following point. From Orbit Standalone or Client : Right click in the panorama view window and choose “Stop” from the context menu. From the Orbit Web client : Double click to stop measuring. This point is also added to the measurement. Length XYZ : Accumulated 3D length for each line segment. See Distance XYZ Length XY : Accumulated 2D length for each line segment, length of the projected 3D object with Z = 0. Length Z : Accumulated difference in height for each line segment. |
 Catenary Curve Catenary Curve | Measure as Distance, but click a 3th point to define the catenary. Disntance over Curve : 3D length over curve Clearance : Minimum height above the ground. The Ground height is calculated by the Z from the photo position minus the Heigt from the camera above the ground. Span : XY distance / 2D length between start and endpoint. |
Area
Measurement of an area, defined by 3 or more points.
 Free area Free area | Click 3 or more positions within the same panorama view window. After clicking the 1st point a connecting line will guide you to click the following point. It is not necessary to “close” the polygon. Orbit will automatically connect start and end point. From Orbit Standalone or Client : Right click in the panorama view window and choose “Stop” from the context menu. From the Orbit Web client : Double click to stop measuring. This position is also added to the measurement. Area XYZ : 3D area on a best fit 3D plane through all measured points. To calculate the XYZ area all measured points are projected on a best fit 3D plane. The result of the XYZ Area is consequently only relevant when all points are located in approximately the same plane. Area XY : 2D area, area of the projected 3D object with Z = 0. Length XYZ, XY and Z : See Free Polyline. |
 Squared area with 3 points Squared area with 3 points | Measure a squared area by defining 3 points. The measurement will be finished by the 3th click. This measure function is useful for more or less horizontal squared areas. |
 Squared area with 2 points Squared area with 2 points | Measure a squared area by defining 2 points. The measurement will be finished by the 2nd click. This measure function is useful for more or less vertical squared areas. |
Volume
Measurement of a squared Volume defined by 3 points.
 Squared volume Squared volume | Measure a “horizontal” squared volume by defining 3 points. 1st and 2nd point define the first base line, 3th point defines height and the 2nd baseline. |
How to measure
- Get the object in picture
Select, navigate and zoom through panoramas to get the desired object in picture.
From the Orbit Standalone or Client :- When using Point Cloud : If a panorama is selected from the MapCanvas only the nearest panorama will be opened in the given direction.
- Measuring without Point Cloud : A selection from the MapCanvas will open the two nearest panoramas.
- Open Measure Overlay Window
Click the Measure icon (4th from top) from the list of icons left in the first Panorama view
- Specify the measure mode
Indicate the way of measuring “using point cloud” or “by triangulation in 2 panoramas” by checking the box “Use Point Cloud”
- Activate Measure function
Activate one of the measure functions and start your measurement.
If a a measure function is activated the appearance of the cursor changes in a rectangular cross and some roaming capabilities in the Orbit Standalone and Client will be changed or disabled.
A single click within the panorama view will execute a measurement. Click and drag to pan, right click (Orbit Standalone or Client only) or scroll to zoom are still available while measuring.
- Measure Object
The behavior and sequence of clicking depends the used measure mode and function. Consult the table “Measure Overlay Window” above.
- View Results
After finishing the measurement, results are automatically shown in the Measure overlay window- Coordinates are always displayed in the Map Coordinate system :
When using the Orbit Standalone and Client this will be the the MapCanvas CRS.
When using the Orbit Web client it is the administrator how defines the Map coordinate system as a configuration from the Publication. - Distances, areas and volumes are expressed in metric units, calculated in a local panorama position coordinate system. This is by far the most realistic measurement result.
- Use or Copy Results
- Copy Results : the button “Copy results” will copy all results to clipboard, semicolon separated
- Click result : Click on one of the results to copy only that value to the clipboard, paste via keystrokes Ctrl + v
- Copy to Feature (Only available from an Orbit desktop client) :
The measurement will be copied to the recorded dataset.- A measurment can only be copied to a dataset model of the same spatial component (points, polylines, areas).
In version 10.5 it is not yet possible to copy a 2 clicks distance measurement to a polyline dataset. - The CRS of the recorded datasets needs to be defined to perform the reprojection of the measurement to the dataset :
Coordinate Reference Systems in Orbit > Dataset CRS - Depending the dataset structure of the recorded dataset 2D or 3D objects will be created :
Dataset Structure Contents > Structure > Manage Models in Dataset > Coordinate
- Add to inventory (Only available from an Orbit desktop client).
The measurement will be used to start the add inventory item procedure.
Only the available inventory themes with the corresponding spatial type (point, line, area) will be listed.
Movie of Catenary measurment