For documentation on the current version, please check Knowledge Base.
The equivalent documentation of the latest release can be reviewed here : Add inventory item.
Add inventory item - Version 10.5
The asset inventory procedure “Add inventory item” allows the Orbit operator to create and document new objects (assets) in one of the available inventory Themes.
Add Inventory Item
Open the procedure “Add inventory item”
Procedures > Asset Inventory > Add inventory item
Theme

Select an available Theme from the drop-down list.
The chosen Theme will be automatically activated and selected in the Dataset List.Consequently the operator will see in one click the already registered objects on the MapCanavas.
Only the Orbit administrator can create new Themes and manage the list of available Themes :
Geometry
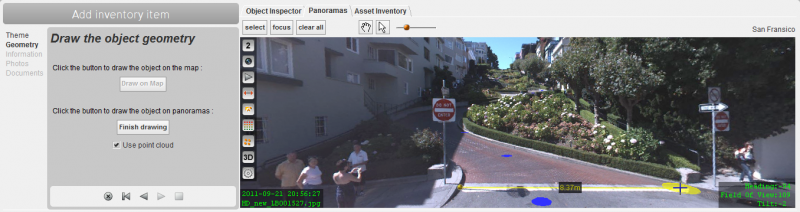
Draw the object (either point, line or area) on the Map or on Panoramas.
Draw on Map
Draw on Panorama
- Use point cloud
Before drawing on a Panorama one need to decide whether to use the available point cloud or not. If no point cloud is available the checkbox “Use Point cloud” will be disabled. - Draw on Panorama
Depending the selected measure mode (Use point cloud) and the object type (points, lines or areas) of the selected theme the appropriated measure function will be enabled automatically.- Draw on Panorama
- The Panoramas tab will be opened and the measure function will be activated. One can start directly measuring.
In this step, the panorama measure overlay window cannot be used. The required measure function is activated automatically. - If required one can still select or navigate through Panoramas : View and Use Mobile Mapping data
As result of navigating or opening another view the measure function may be deactivated. Click “Draw on Panorama” again to restart drawing. - Measure the object conform the used measure technique : Measure in Mobile Mapping data.
- Click to start drawing an object, continue clicking to add points to line or area objects.
- During drawing it is still possible to use the right-click context menu to pan or zoom the panorama.
- Use <Shift> + click (if a point cloud is available) for measuring lines.
- Stop measurement, 2 possibilities :
- Right-click > Stop measurement :
By right clicking in the Panorama or 3D view a started measurement can be finished from the context menu. This last right-click location will be added to the measurement as well.
Advantage here is the possibility to edit single vertices of the measurement. - Finish drawing :
The “Draw on Panorama” button has been changed into “Finish drawing” when starting the measurement. Click “Finish drawing” to end the measurement as it is.
The measurement will be closed. Vertices cannot be edit.
Information
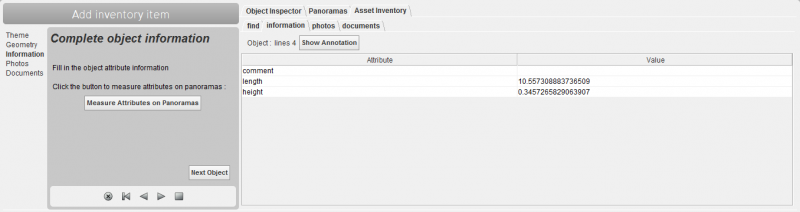
- Fill in the object information fields.
- Show Annotation
Click “Show Annotation” to add an annotation to the inventory item and start creating it using the annotation tools.
Click “Hide Annotation” to save and close the annotation. - Measure Attributes on Panoramas
Measure on Panoramas and copy the result into an attribute.
The panorama measure overlay window becomes available again in this step. This enables the possibility to copy and paste additional measurement values into an attribute while creating or editing assets.
A single click on the measure result in the measure overlay window copies the value onto the clipboard. Next the copied value can be pasted as attribute value. - Next Object
Shorthand way to next Object. In the procedure “Add inventory item”, after drawing the position the “Next Object” button is available in every step.
Clicking “Next Object” will save the inventory and finish the procedure to start immediately a new inventory of the same theme.
Photos
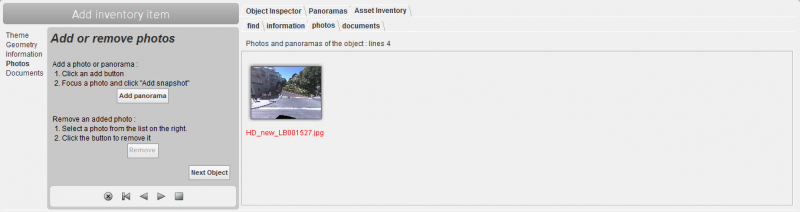
Add one or more snapshots to the object :
- A snapshot (4:3) from the last used view while measuring will be stored automatically with the object.
- Add panorama
- Click “Add panorama”
- Select and focus a panorama
- Click “Add snapshots” from the top toolbar.
- Remove
- Select an added snapshot. Snapshot will be activated with blue frame.
- Click “Remove”
- Notes
- Only one snapshot from each panorama can be stored. A new snapshot from the same panorama will overwrite the previous snapshot. This to avoid to a garbage of snapshots and an object can only be viewed from one direction in a Panorama.
- A snapshot of a panoramic image will be stored as a 4:3 ratio image with the same field-of-view as the panorama view.
Documents
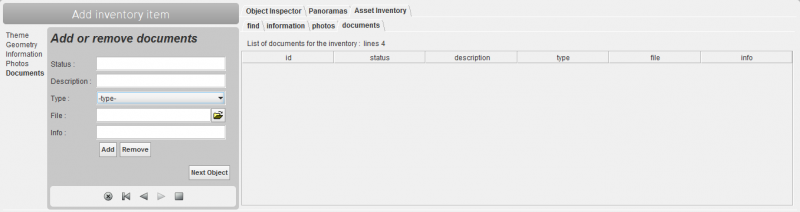
Fill in the required fields and add any document to the object :
- georeferenced maps
- other documents
- other maps
Instruction Movie