For documentation on the current version, please check Knowledge Base.
MM View > Measurements
Open the panorama measure window using the according measure icon from the MM View > Sidebar.
Measure Mode
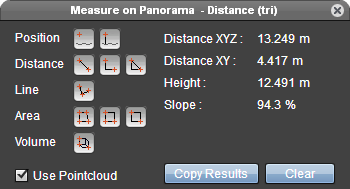
Use point cloud
Mobile mapping measurements can be done with a single click using point cloud or via triangulation using two images.
Indicate the desired measure mode via the “Use point cloud” checkbox to use point cloud (checked) or to measure via triangulation in 2 views (unchecked).
Information about the measure techniques and point cloud hover settings :
A point cloud resources must be available for at least one of the currently opened views to enable the option “Use point cloud”. If there is no point cloud resource available for any of the opened views, this checkbox will be disabled. In case the option is enabled and a measurement using point cloud is done within a view without point cloud the message “No point cloud available for this image.” will be shown.
Activate measure function
Start the desired panorama measure function with a single click on the corresponding icon.
- If a measure function is activated the appearance of the cursor changes in a rectangular cross when hovering the mouse pointer above a panorama view.
- If a measure function is activated the zoom, pan and navigate functions are still available.
Measurements
Results
Displayed coordinate system
Point X,Y,Z measurements are available in the Publication CRS1), WGS84 decimal degrees and WGS84 dms.
The publication coordinate system is set by the administrator. When hovering above the buttons to switch display crs a tooltip with the complete coordinate system name will appear.
Copy Results
Using the “Copy Results” button the displayed measure results will be copied to the clipboard. Results are copied with an id and tab separated ready to be pasted directly in your spreadsheets. The measurement ID is reset to 1 when opening the publication and increases by every successful measurement.
- Single click button : copy results with headers
- <Shift> + click button : copy results without headers, useful when copying series of measurements.
Add to .. Layer
Save the measurement result inside a vector layer. Per spatial type (points, polylines, area) a different layer is saved.
The vector layers are available inside the vector overlays panel. Note, that these vector layers are temporary, the information will be deleted after closing your browser, unless the temporary shapefiles are downloaded using the Vector Overlays window Layer> Export Layer> Download option.