This is documentation of an archived release.
For documentation on the current version, please check Knowledge Base.

Return to Overview - Strabo Sidebar

View Settings


Press the button to get an overview of the current Strabo project in Orbit GIS X.

Press the button for viewing imagery stereoscopically. Right click on the image footprints in Orbit GIS X to popup the extended mouse menu. To start the stereo viewer select either:

  • Show Stereo Explorer (The Stereo Explorer is a basic viewer made for inspection of the stereo imagery. There is no editing capability available in this type of viewer)
  • Show DEM Module (to measure a DEM manually)
  • Show Softcopy (The Softcopy viewer is an extension on the Stereo Explorer that enables the use of all the Orbit GIS interactive functions to interpret the stereo model and capture selected entities with 3 dimensional coordinates. These points, vectors, polylines and areas will be captured in the 3D vector dataset of your choice)

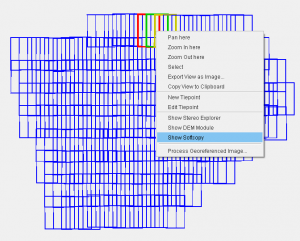
Be sure to click on a location where there is overlap between at least two images. If you click somewhere where no stereo is possible you will see the next dialog:


The toggle 'view project in map' enables to put on/off the image footprints:
Footprint colors and transparancy can be adapted by the 'footprints appearance' menu:


The Preferences button (which you can also find on the main toolbar of OrbitGIS X 
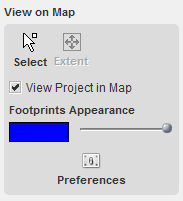
includes the preferences button that displays all components of Orbit and its extensions of which you can change the user options. More information about Orbit GIS Preferences, see : Orbit GIS Preferences.


Activating the Strabo Preferences leads you to the Strabo Preference Menu, i.e. the Map View, Stereo View, and 3D Mouse user options.


Viewing the imagery stereoscopically can also be done per model. Use therefore the 'view in model' button of the 'View in Stereo' sidebar.

Dealing with the synchronization of the Orbit GIS X map canvas and the stereo view can be done in the 'View in Stereo' sidebar.

  • No sync Viewers: the movements (panning) in the Orbit GIS Interactive window are independent of the panning in the Softcopy window.
  • Sync 2D from Stereo: moving the floating mark causes a parallel move in the Orbit GIS window. Only when the floating mark XY coordinate comes close to a border of the Orbit GIS X window, the Orbit GIS X window will be redrawn with coordinate value of the floating mark in the center.
  • Sync Stereo from 2D: panning the Orbit GIS X datasets will cause the floating mark to follow the movements made in Orbit GIS X.
  • Toggle 'Sync Scale': when this toggle is set, the Orbit GIS viewer will automatically be zoomed in, each time the zoom is used in the Softcopy window.

Dealing with the snapfunction of Orbit GIS X (see preferences: editing) can be done by the 'Snap to XY' and 'Snap to XYZ' function. The proximity in which vertices have to snap in directions X, Y and Z is indicated in an amount of pixels near the snappable point and can be changed in the snap preferences (see Preferences of Editing). Those preferences are synchronized with the ones indicated in the beside 'View in Stereo' sidebar. This gives:

for a 3D dataset:

  • Snap to XY : the z-value for snapping is disabled; the z-value will be taken from the floating mark height.
  • Snap to XYZ: the z-value for snapping is enabled; z-value will be taken from the snapped point.

for a 2D dataset:

  • Snap to XY : z-value will be zero.
  • Snap to XYZ: z-value will be zero.


Take into account that the OrbitGIS Mapcanvas zoom will be used to deal with the snap proximity. Synchronizing the views is recommended.

 
Last modified:: 2019/03/25 11:36