For documentation on the current version, please check Knowledge Base.

The Camera Database
 This dialog lets you (i) define a new camera or (ii) edit an existing camera in the camera database. Once a camera is defined it is reusable and available for other stereoprojects. The 'Camera Settings' dialog shows on top a list of existing camera definitions. The existing list of “Predefined Camera's” is saved in the file “../ext/photogrammetry/cameraList.ini”. Use the “Import” and “Export” buttons for exporting camera definitions to other workstations. You can view the respective parameters by selecting the camera of your choice. In case of Visionmap Imagery follow first this procedure: Preparation of Visionmap Imagery
The parameters are made visible using three tabs 'general, fiducial marks, distortion'. In case you are using a standard aerial flight, only the 'general' tab is of importance. Others will be automatically filled. If you need to add distortions, or fiducial mark settings, please go to Advanced Camera Settings.
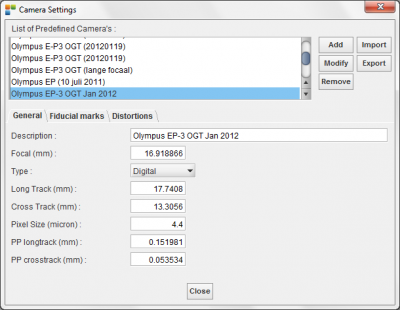
General: This window shows some main editable parameters which are written on the calibration report:
- Description: The description may be any unique name you wish to describe the camera with.
- Focal (mm): The focal distance of the lens is found on the calibration certificate of the camera and expressed in mm.
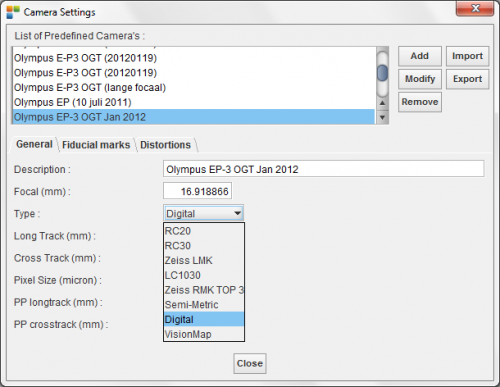
- Type: there is choice between different camera types. This selection must be done for the sake of the automatic measurements of the fiducial marks. It defines the position and the form of the fiducial marks for the different type of cameras: RC20 - RC30 - Zeiss LMK - LC1030 - Zeiss RMK TOP 30 - Semi-Metric - Digital (In case of a Digital camera it is necessary to enter the following parameters correctly: (i) The exact pixelsize expresssed in micron and (ii) The correct coordinates of the corners of the image instead of the fiducial marks in the next tab 'Fiducial Marks' in this camera editor - Visionmap
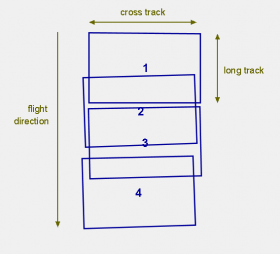
- Long Track (mm):
- for scanned film: the approximate value expressed in mm is sufficiënt.
- for digital images: enter the exact value equal to the number of pixels in the long track of the aerial flight (along the track) multiplied by the pixel size.
- Cross Track (mm):
- for scanned film: the approximate value expressed in mm is sufficiënt.
- for digital images: enter the exact value equal to the number of pixels in the cross track of the aerial flight multiplied by the pixel size.
- Pixel Size (micron): given in the calibration certificate of the camera and expressed in micron.
- PP Longtrack (mm): the principal point of autocollimation along the flight direction.
- PP Crosstrack (mm): the principal point of autocollimation across the flight direction.
These are the coordinates of the principal point found on the calibration certificate and are expressed in mm or pixels. In most cases these PP longtrack and crosstrack are expressed in PP X and PP Y whereas the X-axis is expressed according the orientation of the delivered images. When the images are rotated to fit in the flightplan, the PPX (and PPY) will be rotated as will be shown on the calibration report. Please read carefully the calibration report to interpret.
The PP coordinate will be used in the calculation of the image coordinates.
Fiducial Mark and Distortion parameters, in the camera database.
Use the “Remove” button to completely remove the selected camera from the camera database.