For documentation on the current version, please check Knowledge Base.

Installation
For the installation of the Orbit Softcopy X software run through the next steps:
- Log in as user (with administrator rights). Check if Orbit GIS X is already installed. If Orbit GIS X is not installed: you need to install Orbit GIS X before continuing the installation of Orbit Softcopy, or Orbit StereoView.
- Double click on a downloaded version of Softcopy X on your PC/Network. The installation software will automatically be started.
- Follow the instructions in the install wizard. The wizard will automatically look for the Orbit GIS X directory structure and installs Softcopy X as an extention to Orbit GIS X. After installation of Orbit Softcopy X, or StereoView you always need to startup the Orbit GIS X application first, to be able to run the photogrammetric extension. Press the “Strabo Photogrammetry Extension…” button in the 'Extensions' menu of the Orbit GIS X application to start Orbit Strabo.
Configuring Screen for Stereoview
The stereoview of Softcopy can be set in an anaglyph, stereographics, or in the strabox mode.
Set your stereoview mode in the preference window of Orbit.
| Anaglyph | StereoGraphics | Strabox |
|---|---|---|
 |  |  |
1. Configuring Standard Screen for Anaglyph
Orbit Softcopy includes standard anaglyph viewing to be used on any and all desktop computers. It only requires cyan-red colored glasses. These are cheap and can be purchased on-line for example at www.rainbowsymphonystore.com or at other locations.
2. Configuring StereoGraphics Screens
Orbit Softcopy also support enhanced StereoGraphics® viewing. It requires the proper hardware and the StereoGraphics® ChristalEyes® viewing system to be purchased.
- Load the 3D vision glasses via USB charger.
- Link 3D screen and computer. After reboot, install the screen drivers (manage computer < device manager < update driver via cd-rom)
- Install NVidia Quadro graphic card (original can be displaced).
- Only link 3D screen with pc (use 'dual link' DVI cable), unlink any other screen.
- Reboot and install Quadro driver via NVidia website: 3D vision driver
- Go to NVidia configuration screen and run through the '3D setup wizard'. Now, you should get a 3D view. Activate 'OpenGL quad buffer' (3D properties < basic profile < stereo-activation)
- Start Orbit software & activate in the 'preferences menu' of Orbit: the stereographics view.
- Hereafter, you can link again another screen to the Quadro graphic card.
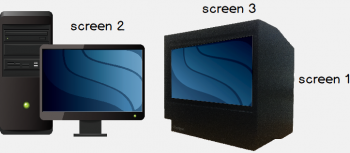
3. Configuring Strabox Screens
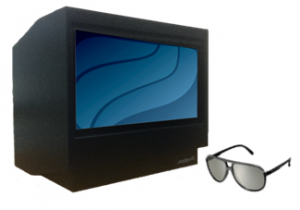
The strabox mode is based on the strabox viewing system. This creates the stereo image based on two screens in a black box, i.e. the Strabox. The first time you'll start up the strabox mode, you'll highly probably need to configure the strabox screens in the right way.
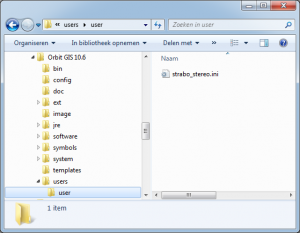
In this strabox the screen at the back is the left image; the screen on the top the right image. The link between the top/back screen and the right/left image is defined in the stereo.ini file (“…/Program Files/Orbit GIS X/Orbit GIS X/users/name/strabo_stereo.ini”).
This stereo.ini file can look like:
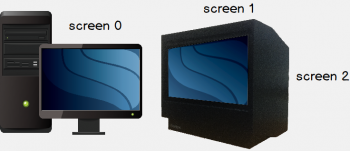
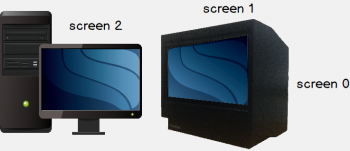
Setup=
 Name=Strabo
 Screen=
  Id=L
  DeviceId=\Display2
  Index=0
  FlipX=false
  FlipY=false
 Screen=
  Id=R
  DeviceId=\Display1
  Index=0
  FlipX=true
  FlipY=false
Setup=
 Name=Strabo
 Screen=
  Id=L
  DeviceId=\Display0
  Index=0
  FlipX=false
  FlipY=false
 Screen=
  Id=R
  DeviceId=\Display1
  Index=0
  FlipX=true
  FlipY=false
Setup=
 Name=Strabo
 Screen=
  Id=L
  DeviceId=\Display1
  Index=0
  FlipX=false
  FlipY=false
 Screen=
  Id=R
  DeviceId=\Display3
  Index=0
  FlipX=true
  FlipY=false
The values for the DeviceId's in this file should be set correctly for each screen. By running Strabox Softcopy you can see if the images are correctly placed on the Strabox screens. If this is not correct, you need to replace the two display values again in the stereo.ini file. Onces run through this configuration proces, the strabox mode will appear correctly.
Configuring the 3D Mouse
Orbit Softcopy supports the use of a 4 different mouse types. While you can use the PC's system mouse to pan, zoom in/out, or move the floating mark in Softcopy, Orbit X supports also 3D mouses to create or edit in a fast and accurate way objects in stereo. The system mouse is used for Orbit GIS actions. Besides this it can handle some softcopy actions. Nevertheless, we advice for the professional the use a 3D mouse.
Four supported types:
| Standard System Mouse | Stealth 2 3D Mouse | Stealth 3 3D Mouse | Immersion SoftMouse |
|---|---|---|---|
 |  | 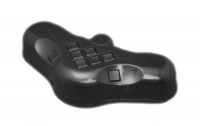 |  |
| www.stealth3dmouse.com | www.stealth3dmouse.com | www.softmouse3d.com | |
| Documentation and Driver | Documentation and Driver | Quick Install Guide |
The 'preferences window' of Orbit GIX X displays all components of Orbit wherefore you can change the user options. The Strabo button in this preferences menu shows the configuration for the 3D mouse. For information about these preferences and settings, see Strabo Preferences 3D Mouse. You need to install these preferences before you can start using the 3D mouse.
Licenses
There is a one month free license coming with the installation. After one month the software will request for a license key. All Licenses must be requested using the 'Edit License…' function in OrbitGIS X. This dialog will show a list of all the extensions that need a license. Select the licenses that you require and request the licenses by sending the email.
More information about licensing can be read here: http://www.orbitgis.com/kb/technologies/licenses/index