For documentation on the current version, please check Knowledge Base.
Map Component
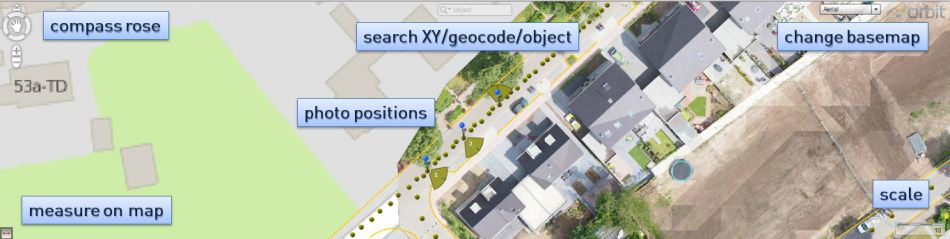
Compass rose
The compass rose in the left upper corner of the Map component provides all map navigation tools in a single widget.
The mouse-scroll provides a fast zoom.

|
|
Measure on Map
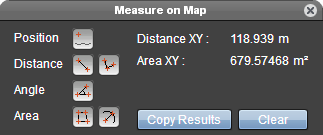 Using the measure icon from the left lower corner of the Map component the Map measure window can be opened.
- Position
A single click on the map displays the X,Y coordinates.
The results are available in the publication CRS defined by the Orbit administrator, WGS84 decimal degrees and WGS84 dms.
- Distance
- 1 : A two click measurement. The second click stops the measurement.
The heading is the angle (clockwise) between the north direction and the measured line. - 2 : A multi-click line measurement ending with a double click.
- Angle
The intersection angle of two line measurements (type Distance 1).
- Area
- 1 : A multi-click area measurement ending with a double click.
- 2 : A two click circle measurement. The first click defines the circle center, the second click defines the radius and finishes the measurement.
- Copy Results
Using the “Copy Results” button the displayed measure results will be copied to the clipboard. Results are copied with an id and tab separated ready to paste in your spreadsheets.- Single click button : copy results with headers
- <Shift> + click button : copy results without headers, useful when copying series of measurements.
Search on Map
The search box on top of the map component lists all search engine plugins configured by the administrator.
Using this entry field it is possible to search for a location to open and focus the nearest image. On a successful request, all opened panorama views will be replaced by the nearest image focused to the requested location and the map will zoom (scale defined by administrator) and center the requested location.
Geocoding
Enter an address or location specification depending the capabilities of the geocode plugin.
XY-search
Search for XY coordinate.
- Input pattern : <X coordinate><separator><Y coordinate>
- Coordinate separator : space, comma or tab
- Decimal separator : dot or comma if not used as coordinate separator.
- CRS : the publication coordinate system (defined by administrator) will be used as coordinate crs.
Review the publication crs via the panorama information / metadata function.
Object-search
Search for dataset object attributes in the map visible vector overlays.
- Only the map visible vector overlays will be used to search in.
- Use “%” or “*” as wildcards.
- If multiple attribute matches are found, only the first result will be used to open and focus the nearest image.
Photo positions
The photo positions or recording locations are visible as dots if the map scale > 1/5000. A simplified line presentation is used for smaller scales if set by the administrator.
Heading and field of view of visible images are also nicely represented in the pie-slice presentation on the map. The visibility can be set via the vector overlay window.
Check the page “Navigation on panorama images” for a complete overview of all navigation functions, such as opening an image by clicking a photo position on the map.
Basemaps
The available basemaps and vector overlays are managed by the Orbit administrator.
Any combination of supported resources can be used as basemap.
Change basemaps
Using the drop-down list from the right upper corner of the Map component it is possible to switch between available basemaps.
Vector overlays
The visibility of available vector overlays can be set via the vector overlay window, opened from the Image Toolbar.
It is up to the administrator to define the available vector resources.
Note, a vector dataset may not be visible due to scale limit limitations.
Scale bar
The scale bar is displayed in the lower right corner of the map component.