For documentation on the current version, please check Knowledge Base.
Great Topics about Editing Objects
This page publishes 5 topics about Editing Objects you should know as an Orbit user. It gives a closer look to some important aspects of editing in practice:
Move while editing
While editing, it is possible to move the map view without losing the activated function:
Click right on the map and the Mapcanvas Context Menu will appear:

Pan, zoom in or out to move to the prefered position and continue your edits.

Example: While drawing a new road, the drawer comes to the edge of the mapcanvas.
Click right, pan to put the clicked position in the middle op the map and continue editing. The activated function (bottom left) remains.
Cut and merge
Using the cut and merge tool with polygons, it is very important to consider that object points of neighbouring objects are common or not.
Merging neighbouring objects into a single one, can result into false polygons.
Cut  :
:
- Select the object you want to cut.
- First click on the edge of the selected area.
- Every next click will result in a vertex of the shared borderline.
- The last click should be on the edge of the selected area.
- The resulted objects, each have the same attribute set.
- Note that clicking outside of the area results in a false polygon. (Example 1)
Merge and remove shared borderlines  :
:
- Select at least 2 neighbouring areas.
- Initiate the merge function.
- The multiple objects dissolve into a single object.
- Attributes of multiple objects are dissolved as well.
- Note that when nearby vertices are not common, a false polygon will be created. (Example 2)
Cut and merge:
- The result of a cut area (2 neighbouring areas), will dissolve into a single polygon when merged.
- Neighbouring objects of an object that is cut in two, have no common vertices on the new shared borderline (between the cut objects). (Example 3)
- Use the Add, move or remove a point-functions to make sure all neighbouring points are common before merging.
| Examples | |
|---|---|
| Example 1: Clicking outside of the area results in a false polygon. | 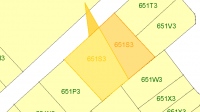 |
| Example 2: When nearby vertices are not common, a false polygon will be created |  |
| Example 3: Neighbouring objects of an object that is cut in two, have no common vertices on the new shared borderline. In the red circle, there is no vertex for the selected object. The cut objects can be recognised by the label 651S3. | 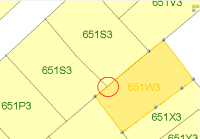 |
Go and multiply
The duplicate objects function  multiplies the selected object(s).
It is also possible to multiply the selected object(s) to another dataset (Control + Duplicate object).
Duplicate object(s) to another dataset (Ctrl + ):
- Select the object(s) you wish to copy.
- Tick the dataset list record indicator
 of the dataset you wish to copy the object(s) in to.
 - Initiate the function: Ctrl + Duplicate.
Note that it is not possible to duplicate lines or areas to a points dataset and vice versa. Similarly it is not possible to duplicate lines to an areas dataset and vice versa.
Also note that attribute values are copied if both the source and the target dataset include the same attributename.
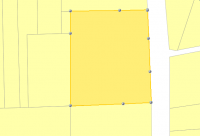
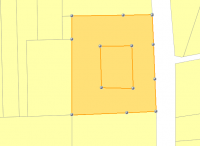
Create Donuts
A donut is a polygon with a gap in it.
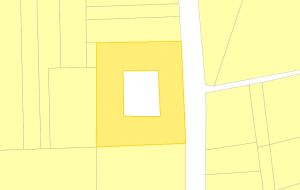
To create such a donut you can use the edit tools and follow the steps below:
- Draw the polygon that contains the perimeter of the donut you want to create.
- Draw the gap you want to create inside the first polygon.
- Select both overlaying polygons and use the tool
 “merge selected objects and remove shared borderlines”
 - The donut is created
| Step 1 | Step 2 | Step 3 | Step 4 |
|---|---|---|---|
 |  |  | 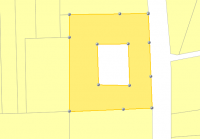 |
<WRAP third column 63.5%>
</WRAP>
<WRAP fourth column>
| Step 5 |
|---|
 |
</WRAP>
↑ Back to top
Special moves
The following table lists some special functions to move objects.
Note that move-functions apply to all selected objects.
| Move Function | Example | |
|---|---|---|
Alt + Move | Move the selected objects by clicking a random position on the map (outside the selected objects) and dragging the cursor to another position. The cursor is shown as a cross (red circle), even outside the selected objects (red circle). | 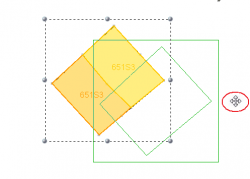 |
Rescale | Click a position and drag to rescale the selected object(s),based on the center of the selected object(s). | 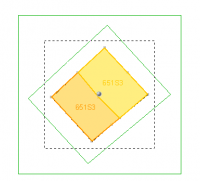 |
Fit in object(s) | Indicate 2 directions (green arrows) to fit in the selected object(s). | 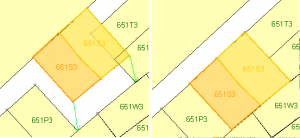 |
Flip over | Select a construction line and initiate the flip-over function to flip over the selected object(s). The objects are reflected over the construction line. | 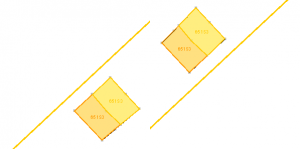 |
Make it square
Square object(s) and square object(s) to a construction line are 2 functions that make a square out of an almost quadrate polygon (4 vertices).
| Square function | Example | |
|---|---|---|
Square object(s) | Select the object to be squared and initiate the function. | 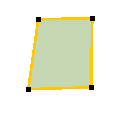 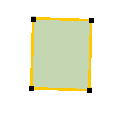 |
Square object(s) to a construction line  | With the First click the square function projects the main axes of the object(s) parallel and perpendicular to the construction line. The second click will project the other axes parallel and perpendicular to the construction line. The result is a squared object. | 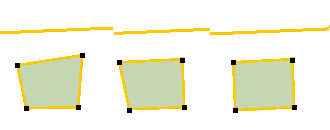 |