For documentation on the current version, please check Knowledge Base.
Dataset Structure Naming
When choosing Naming in the dropdownlist, one can do more than only change the name of some elements of the model structure. Below is a brief overview,
Page Index
- Naming : Change the username of an attribute (set)
- Hyperlink : Add a hyperlink to an attribute
- Annotations : Link an attribute with an annotation
- Primary Field : Choose an attribute of witch the value serves as better object identifier
- MapTip Field : Choose an attribute of witch the value serves as a maptip for the object
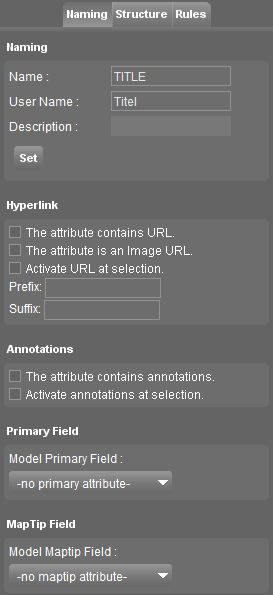
Naming
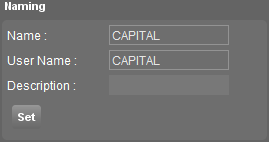
In this frame, one can rename some elements in the model structure. Therefore, one must click on the element in the Model Structure . The frame will be activited when it is possible to change the user name of an element. Fill in the text box and click on the Set button
| Element in model structure | Original | After |
|---|---|---|
| Description | |  |
| Attribute set | |  |
| Attribute | |  |
Hyperlink

This option adds a hyperlink to a certain attribute. Depending on the attribute value of an object, action will happen. This action will happen directly (Activate URL at selection) or after clicking the show hyperlink document button ![]() from the object inspector . In case the show hyperlink document button is disabled
from the object inspector . In case the show hyperlink document button is disabled ![]() , enable the Show Hyperlink Document-button by selecting the attribute value that contains the hyperlink.
, enable the Show Hyperlink Document-button by selecting the attribute value that contains the hyperlink.
It's very important to specify the correct URL. Otherwise no or the wrong action will happen. The URL contains a fixed part (prefix and suffix) and a variable part (attribute value). It can be a path to an external document (image, text document, etc…) or a link to a website. Orbit will recognize the data type and open the file with the proper program (word, adobe reader, etc…) or the standard webbrower.
<WRAP first column>
| Option | Description |
|---|---|
| The attribute contains URL | Activates the hyperlink option for an attribute. |
| The attribute is an Image URL | Indicates that the URL refers to an image (file in general) and not a site. |
| Activate URL at selection | Opens the document or site directly after clicking on the object. |
| Prefix | Part of the path that is placed before the attribute value. |
| Suffix | Part of the path that is placed after the attribute value. |
</WRAP>
<WRAP second column 29%>
</WRAP>
To create a hyperlink, one must click on the attribute in the Model Structure on which he wants to add a link. The frame will be activited when it is possible to add a hyperlink.
Example
In this example is a hyperlink created (on the attribute NAME) to the wikipedia site of the selected country. We don't check the attribute is an Image URL box because the path leads to a website.
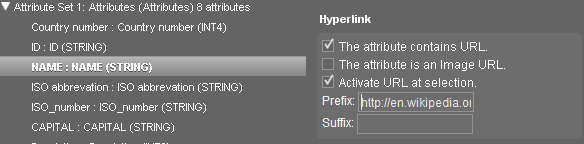
To form the correct path, following parameters are taken into account.
| prefix | http://en.wikipedia.org/wiki/ |
| attribute value | Angola (attribute value) |
| suffix |
This results in following URL: http://en.wikipedia.org/wiki/Angola
The site will be opened by clicking on the object or by clicking on the attribute value. This is because the Activate URL at selection box is checked.
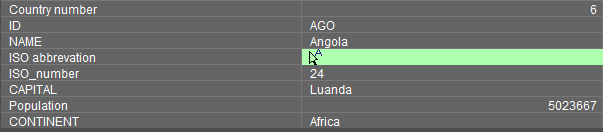
In the object inspector , the value of the attribute with the hyperlink will by marked in a blue color.
Annotations

When the the attribute contains annotations checkbox is checked, an Annotation is stored in that attribute of each spatial object. The annotation initially contains no objects and has no name. Therefore the attribute value will be empty. Once a user starts to create the annotation, the objects are stored in the annotation file which is linked with the attribute. The name of the annotation serves as the attribute value.
The annotation is always displayed after clicking on the attribute value. When the Activate annotations at selection box is checked, the annotation is displayed directly after the selection of the spatial object.
In the object inspector , the value of the attribute which stores the annotation file will be marked in a green color and has the annotation selection button in the beginning.
Regarding annotations, we can distinguish two groups of users. One group will only consult the annotations and has no rights whatsoever to create/change the annotations. The second group has more rights and will manage the annotations. They can add objects to the file and change the name.
To close the annotation, go to the Annotation Tools Sidebar and close the annotation.
Primary Field

The primary field is related to the objectlist of the object inspector . After the selection of one or more spatial objects, all these objects are listed in the objectlist of the object inspector. In the list, the objects are represented by their internal reference ID. The user sees a list of numbers and this isn't very clear. The primary field can come in handy to interpret the selection in an easier way.

In the dropdownlist, one can choose an attribute of the dataset. After selection , the value of that attribute will be shown in the objectlist instead of the internal reference ID. Below is an example where the attribute NAME is chosen as primary field. The dataset contains the countries of the world. the difference in clarity between the random list of numbers and the list of names is obvious
| Objectlist with internal reference | Objectlist with a chosen primary field |
|---|---|
 |  |
MapTip Field

The maptip is another means to add clarity to a dataset. While hoovering over the spatial object, the value of a certain attribute is shown in a yellow textbox. The attribute of witch the value is shown will be determined by the maptip field.
Below is an example where the attribute CAPITAL is used. For each country, the capital of that country will be showed as a maptip.
