
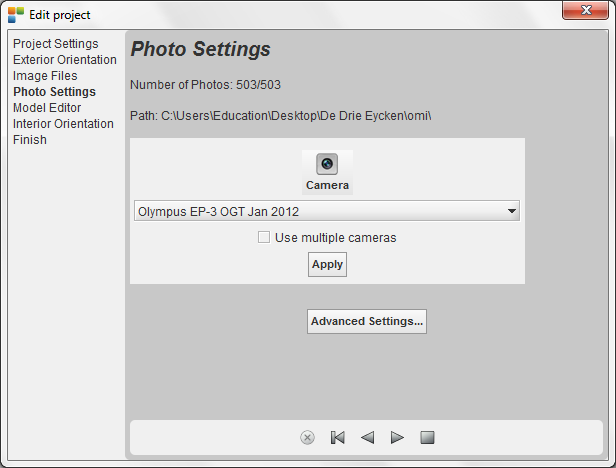
Project Wizard - Step 4: Photo Settings
This step is intended to be able to apply changes to parameters of the photos such as camera, image rotation, opk parameters, etc. If whole project is based on one camera, you can create, add, or import a camera from the camera database. If the project exists of more than one camera, please tick the 'use multiple cameras' and link the camera to the individual photos via the 'advanced settings' button.
|
|
advanced settings...To change parameters for one photo
The changes are immediatly applied and active in the project. When you e.g. change the Kappa value, this will immediately be seen on the OrbitGIS overview or in an opened stereo viewer looking at a model where this image is part of.
|
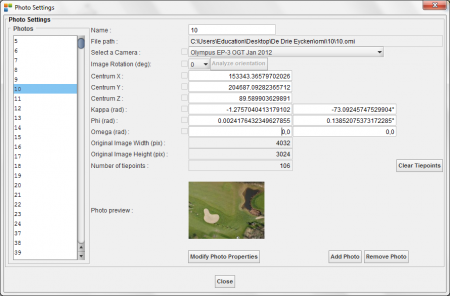

The photo parameters
- Name: the name of the photo must be exactly the same name of the image filename without the extension.
- Select a camera: select a camera from the available list in the drop down combobox.
- Image rotation: it is possible that the image is rotated during the scanning phase against the normal situation displayed on the calibration document. Selecting a camera will change the images rotation in an automated way but sometimes interpretation is needed.
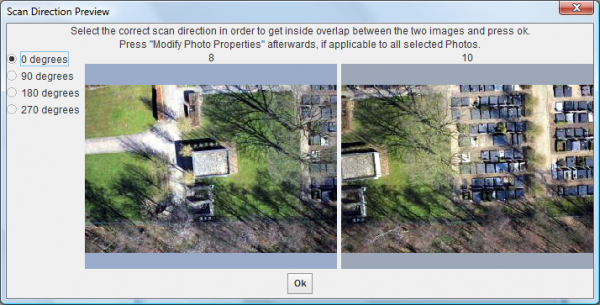
Select the appropriate rotation angle to get the image back into a normal situation. To help you to make a fast and correct decision, use the 'Analyze orientation' button: you can only press this button if you have selected at least two photos for which the images are available, and the kappa is oriënted in the same flight direction. Please select 2 images that are part of a same flight direction.

The image files have to be available because they will be viewed. Pressing the 'Analyze orientation' button will show the next 'Scan Direction Preview' dialog:
 .
.
We can accept this setting (0 degrees) if the images would be used in this actual oriented situation
(there is overlap between the images as they are shown). Pressing the option '180 degrees' gives the next situation:
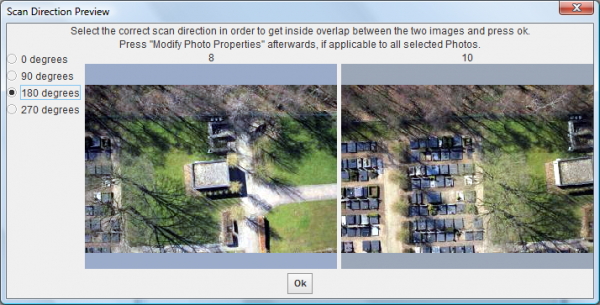
It is possible that in function of the provided imagery, we have only a good overlap between the images when selecting a scan direction different from 0. Press the 'Close' button to stop the preview. To change the 'Scan direction' for several photos at once (e.g. a strip), you must:- Determine the correct “Scan Direction” for the requested photo's as explained above.
- Select the to be treated photo's.
- Select the 'Scan Direction' checkbox in front of the 'Analyze orientation' button.
- Select the 'Scan Direction' rotation angle (0, 90, 180 or 270 degrees).
- Press the 'Modify Photo Properties' button to make the change effective for all the selected photos.
- Centrum X: the projection center's X coordinate.
- Centrum Y: the projection center's Y coordinate.
- Centrum Z: the projection center's Z coordinate.
- Kappa: the kappa rotation angle expressed in radians and in degrees. For vertical photogrammetry, Kappa is the rotation around the vertical axis.
- Phi: the phi rotation angle expressed in radians and in degrees. For vertical photogrammetry, Phi is the rotation around the axis defined by the wings of the airplane.
- Omega: the omega rotation angle expressed in radians and in degrees. For vertical photogrammetry, Omega is the rotation around the axis defined by flight direction of the airplane.
- Width in image pixels: the width of the original digital image in number of pixels. This value is only necessary when using digital images without real fiducial marks.
- heigth in image pixels: the height of the original digital image innumber of pixels. This value is only necessary when using digital images without real fiducial marks.
- Number of tiepoints: the actual number of observations made in this photo used as tiepoint.