Movie Maker
This page describes how to use the extension Movie Maker to create 3D point cloud fly-through movies from the mobile mapping 3D view.
![]() Main Toolbar > Manage > Movie Maker
Main Toolbar > Manage > Movie Maker
Concepts
Map 3D
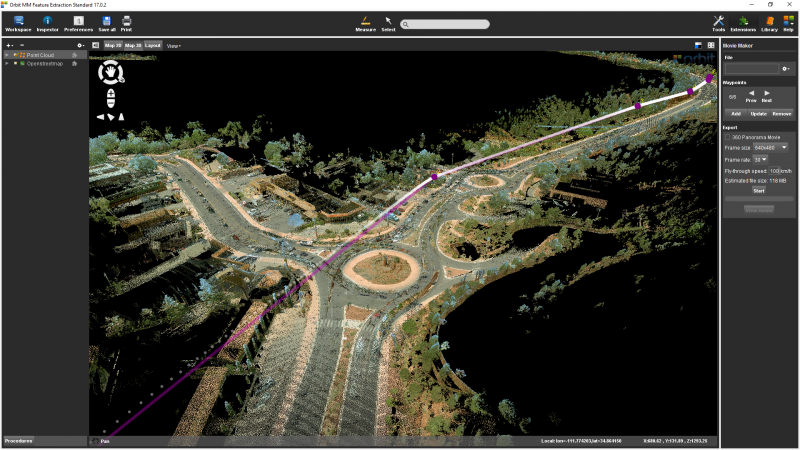
The fly-through movie is a simulated navigation on the Map 3D following a predefined 3D Movie Path.
All visible 2D and 3D resources are included into the movie recordings as visible on Map 3D.
3D Movie Path
The Movie Path is defined by a list of Waypoints. A Waypoint combines a coordinate and view direction.
Movie file
As of today, Microsoft's *.avi file format is the only supported movie export file.
An *.avi file is limited to 4GB.
Sidebar
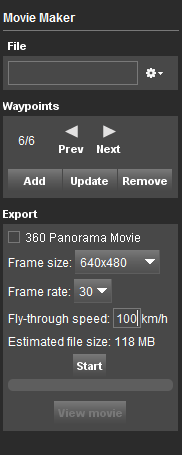
File
Save your 3D Movie Path into an Orbit Movie Maker Project (*.omp).
Create a new Movie Maker Project, open, save or close the opened project via the file drop-down menu.
Waypoints
Manage and create the Waypoints of the 3D Movie Path.
- Previous / Next : Set the Map 3D View to the previous or next Waypoint.
- Add : Add the current Map 3D View Position as Waypoint.
- Update : Replace the selected Waypoint by the current Map 3D View Position.
- Remove : Delete the selected Waypoint.
Export
Process the Movie file as defined by the 3D Movie Path.
- 360 Panorama Movie : Option to generate 360×180 panorama movie.
- Frame size : Select resolution, ratio 4:3, 16:9 and 2:1 (required for 360 panorama movie) are available.
- Frame rate : Select frame rate per seconds.
- Fly-through speed : Set fly-through speed
- Estimated file size
- Start : Start processing fly-through movie, the Save File window will pop-up to specify the export file and directory.
- Stop Export : Upon start, the “Stop Export” button allows direct completion of the partially processed fly-through movie.
- View movie : Upon completion or Stop, the “View Movie” button delegates movie display to the operating system.