This is documentation of an archived release.
For documentation on the current version, please check Knowledge Base.
For documentation on the current version, please check Knowledge Base.
http://3dmapping.cloud/about-3dmc/about-screen-layout/
Screen Layouts in the Workspace sidebar
Open the Workspace sidebar using the flyout :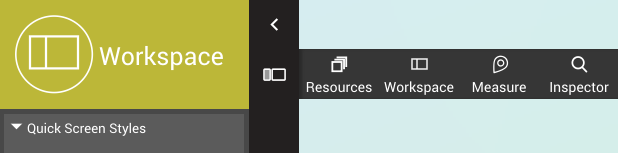
Using the Screen Layouts
Pick one of the presets to set your Screen Layout. There's a choice between a single 3D view, or a combination of the 3D view with a base map either at the top, at the left side or floating, and more.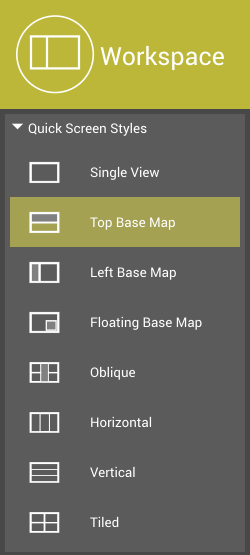 When selecting Top Base Map, Left Base Map, Floating Base Map or Oblique, all other part(s) shows the standard multifunctional view. But it also adds new capabilities starting with the menu options to be found central-top in the viewer :
- Click on the View icon to switch to any view mode : 3D view, Spherical Image, Planar Image, .. according to the data you have opened. See below.
- Click on the Number to open a new menu : Use 'Add' to open a next viewer, or 'Move' to reposition the current view by a click on the Base Map, use 'Close' to close a viewer (you can't close the last one). See below.
- When viewing Oblique Images, you can supplementary switch viewing direction.
Using the Reference Map
Several Screen Layouts have a Reference Map (slightly grey in the iconography). This reference map is used to display a 2D base map, e.g. an orthophoto or a street map, allowing to position the other views on that reference map. Navigation in the Reference Map is very intuitive : just click and drag to roam around, or use the scroller to zoom in and out. It's very much like any other 2D or GIS map navigation. The Reference Map also has supplementary options : - geocoding service : type in the address you're looking for, and it will try to find the location. - base map choice : if you have more than 1 base map selected, you can pick your base map here. - you can use the current base map in the 3D view as well. Looks really nice ! To read more about Base maps, see About Resources. We also have a blog page introducing the Reference Map : Using the Reference MapUsing the standard View
The standard 3D Mapping view is always available, in any of the Screen Layouts. This view shows your resources in 3D, or in any other appearance according to the chosen resources. This component has 2 menu's situated centrally at the top of the window.Options Menu
This menu shows the number of the view on top. If you have multiple views open, this number is also used to reference them on the Reference Map.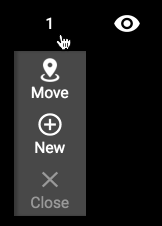
- Move : click on the Reference map to move your viewpoint ion this view to the desired location
- Add : Open an additional View
- Close : Close this View - you cannot close the last view
- Rotate Counter Clock Wise : If you are viewing Oblique Imagery, rotate our view to the nearest CCW image.
- Rotate Clock Wise : If you are viewing Oblique Imagery, rotate our view to the nearest CW image.
View Menu
This menu switches between the available view modes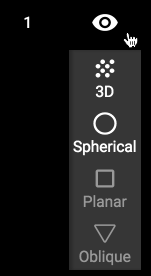
- 3D Point Cloud viewing
- Spherical image (e.g. street-level, indoor, ..)
- Planar Image (e.g. Nidar image from drone mapping)
- Oblique Image (multiple oblique images will sync)
Triangulation and Multi-View Measurement
We've migrated our very powerful desktop measurement capabilities, including the use of triangulation based measurement (image only, no point cloud use) and the capability to start measuring in one view and continue in the other one to pick the best view for each vertex in your measurement.
Last modified:: 2022/04/15 06:19