For documentation on the current version, please check Knowledge Base.
Navigate on Image View
This page describes how to use the desktop image view.
Documentation on 3D point cloud view, see Navigate on 3D Point Cloud View
Open Image View
From Map
To open an image view from the Map, review Open Image or 3D View from Map.
From 3D View
Click the image icon from the Mobile Mapping Side Functions.
From Image View
There are a few nice methods to open another image within an existing image view. Review the documentation below on “Open Image”.
Pan and Navigate
Pan function activated
 Pan, zoom and navigate on an image view using the Pan function.
| Left Click | ||
|---|---|---|
| Click and Drag | Pan | Move or Pan the view changing heading and tilt. |
| Double Click | Center | Center the view to the clicked location |
Double Click  | Center Map 2D | Double click the image information in the left lower corner of the image view to center the map to the photo position. |
Double Click  | Reset Tilt and FOV | Double click the orientation angles in the right lower corner of the view to reset tilt (0°) and field of view (90°). |
| <Shift> + Click | Open and focus image | Open and focus the image nearest to the clicked location with a minimum distance of 1.5 meters. This function requires the point cloud hover to operate. |
| Left Click on Photo Position | ||
|---|---|---|
| Single Click | Open image | Click a blue photo position to open the selected image. Heading and Field of view will be retained. Tilt will be reset to zero. |
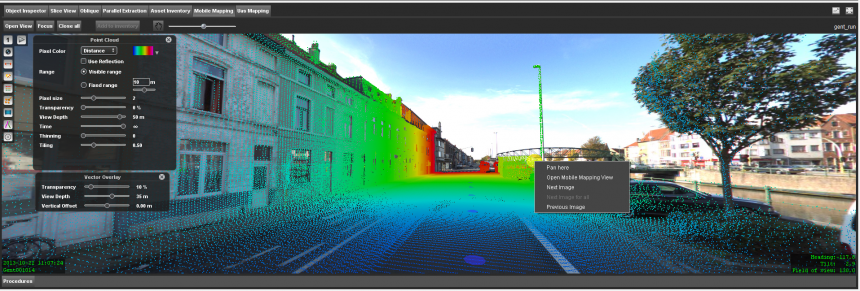
| Right Click | ||
|---|---|---|
| Single Click | Context menu | If the “pan” functions is activated a right click within the image view opens the context menu. |
| Pan here | Center the image view to the clicked location, without adjusting the field of view (zoom). | |
| Open Mobile Mapping View | Open the closest image and centralize to the clicked location. | |
| Next Image | Open the next image (in time sequence) in the current view. | |
| Next Image for all | Open the next image considering all open images | |
| Previous Image | Open the previous image (in time sequence) in the current view | |
| Mousewheel | ||
|---|---|---|
| Scroll | Zoom | Zoom in or Out conform the MapCanvas Zoom direction. The center of the view will be retained. |
| <Ctrl> + Scroll | Next/Previous image | Go to the next or previous image. |
Measure function activated
 Pan, zoom and navigate on an image view when a Measure function is activated.
In measure mode most pan and navigate functions are still available as described above, but there are a few differences to simplify the image handling while measuring.
| Left Click | ||
|---|---|---|
| Single Click | Measure | Click a measurement point. Click and drag to pan. No measurement will be executed. |
| <Shift> + Click | Open image | Open the nearest image to the clicked location with a minimum distance of 1.5 meters and retain the image orientation angles. No measurement will be executed. This function requires the point cloud hover to operate. |
| Right Click | ||
|---|---|---|
| Single Click | Context menu | If the “measure” functions is activated a right click within the image view opens the context menu. |
| Stop measurement | Stop measurement here while measuring a polyline or an area. | |
| Pan here | Center the image view to the clicked location, without adjusting the field of view (zoom). | |
| Open Mobile Mapping View | Open the closest image and centralize to the clicked location. | |
| Next Image | Open the next image (in time sequence) in the current view. | |
| Next Image for all | Open the next image considering all open images | |
| Previous Image | Open the previous image (in time sequence) in the current view | |
 Walk-through the images automatically using the Play function from the mapping sidebar. Or use the arrows on the keyboard to move manually through the images.