For documentation on the current version, please check Knowledge Base.
Blur and Erase
This page describes how use the Orbit desktop extension “Blur & Erase”.
![]() Main Toolbar > Extensions > Blur & Erase
Main Toolbar > Extensions > Blur & Erase
Concepts
“Blur & Erase” extension makes it possible to blur or to erase parts of original spherical and planar mobile mapping images. Blur and erase can be applied to mask or hide for example license plates and faces for privacy reasons.
Original and Processed Images
The Blur and Erase workflow is designed to define regions on original images and to apply these definitions when creating the processed image.
Blur or Erase areas will be defined on the image openend in the Mobile Mapping tab. If available, the processed image will be openend. If no processed image is available, the original image will be opened, see Optimize Imagery.
Original Images can be optimized into Processed Images to apply blurring. Both Original and Processed Images can be exported to apply blur and erase definitions.
If a processed image is used to define blurring, the exported file must be copied manually from the processed_blurred folder into the processed panorama image folder to be used by Orbit Desktop and Publisher.
Blur vs Erase
Mask one or more regions on an image by :
- Blur : Fade color of image pixels, to make the defined region blurry. A smooth transition between blurred and non-blurred regions is applied.
- Erase : Set a fix image pixel color. A different color can be set to erase above and below horizon.
Files & folders
Blur/erase definitions are saved in .xml files next to the used image.
Sidebar
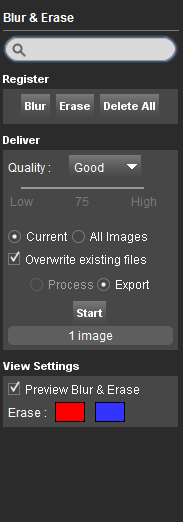
Search box
Search for a particular image or group of images to process, by using their name or a part of their name, inside the opened run folder structure. The result of the search will be highlighted on the Map. The first corresponding image found will be automatically opened in the MM View.
Register
Blur
Draw a polygon around the area to be blurred, directly on the MM Views.
Erase
Draw a polygon around the area to be erased, directly on the MM Views.
Delete All
Delete all drawn shapes.
Deliver
Quality
Set the compression quality for the processed images.
Select one of the preset values or use “Custom” to set any quality value via the slider below.
Higher quality will increase the file size and the corresponding time to load the image.
There is no point to process the images with a higher quality than the original image files. For most use cases jpg quality 80 “Good” will be ok.
More information about the effect of jpg quality and compression : https://en.wikipedia.org/wiki/JPEG.
Current
If flagged, only the current image will be processed.
All Images
If flagged, all images in the run folder will be processed, even if no polygons are present in some of them.
Overwritte existing files
If enabled, the original imagery will be overwritten. If not, a .xml file that contains the polygons coordinates will be added, and used as a mask instead of modifying the original imagery.
Process
If enabled, the resulting blurred imagery will be created in the same folder as the input imagery folder. The result is an Orbit Multi Resolution Image (*.omi) file.
Export
If enabled, the new images will be saved in a new folder, called “ processed_blurred” inside the “panorama” folder of the respective run. The result files will have the same extension as the input imagery.
View settings
Enable or disable changes preview. Choose the color for the blurring polygon and for the erased parts.