For documentation on the current version, please check Knowledge Base.
Import Mapping Resource
This page describes the desktop administration procedures “Import Mapping Resource”.
![]() Procedures > Aerial / Mobile / Oblique Mapping > Import Mapping Resource
Procedures > Aerial / Mobile / Oblique Mapping > Import Mapping Resource
Concepts
It is recommended to read first Orbit Mapping Resource.
The “Import Mapping Resource” procedure imports and processws a set of raw mapping resources according a well defined Orbit Import Template into an Orbit Mapping Resource.
The “Add Mapping Resource” procedure can be used to link immediately already imported Orbit Mapping Resources to the Orbit setup.
More information on Add, Remove and Manage Runs, see Manage Mapping Resources.
The import procedure consists out of 2 consecutive wizards :
- Create a new Orbit Mapping Resource definition.
- Import data according the selected Import Template.
The available steps of this second wizard depends on the used Import Template.
Create Mapping Resource
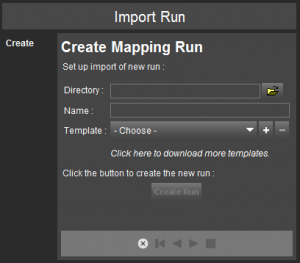
Directory
Specify the directory where the new Mapping Resource needs to be stored.
Remarks :
- Do not create a new Mapping Resource inside an existing Mapping Resource folder. If you do so, Orbit will recognize the structure and will open the Mapping Resource upon Create Mapping Resource, see below.
- The original data will be organized and processed into the specified directory. Ensure fast access to storage access and sufficient disk space.
- On using Client/Server, special attention is required regarding data management and file access, see Manage Mobile Mapping in Client-Server.
Name
The name of the Mapping Resource is fixed and defined by the folder name.
Template
Select the Import Template to be used.
Use the according buttons to add, remove or get access to template download page.
- default available generic templates cannot be removed.
- download, unzip and point the *.omr file to add a new template.

Depending on the used Import Template, it might be required to select the coordinate system of the original import files. Do not use a Geographic template to import Projected resources and vice versa.
- For a geographical template, no CRS needs to be entered.
- For a projected CRS, the coordinate system of the original data to be imported needs to be entered.
- For original data in non-metric units of measurement, a conversion to the metric system is required upon import.
- Source: the original non-metric CRS needs to be entered.
- Target: the corresponding metric CRS needs to be entered.
- For original data in a metric system, the source and target CRS needs to be identical.
More information on Import Templates, see Mapping Resource Import Templates.
Create Mapping Resource
Click “Create Mapping Resource” button to confirm. Upon confirmation the 2nd wizard to import data will start.
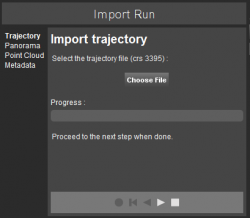
Import Mapping Resource
The below documentation describes the import of local resources.
The wizard and parameters to establish a connection to an online service are dedicated for each provider.

A new import will replace the previous import.
Trajectory: Mobile Mapping only
Import trajectory file.
Panorama / Planar
Import photo positions file and move images of the current camera to the indicated directory: <Orbit Mapping Run>/<camera>/original/. Optionally an image link.ini redirect file can be used to avoid data copy, see Orbit Mapping Resources - Structure and Configs.
Repeat this for each available camera.
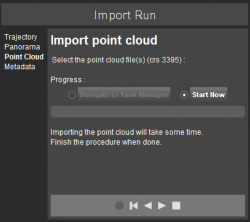
Point Cloud
Import point cloud files by selecting the point cloud file(s). Choose to delegate the optimization to the task manager or directly start processing.
All selected point cloud files will be merged into one Orbit Point Cloud file.
Annotations
Import blur, erase or object annotations.
- XML/CSV per Run: There is one csv or xml file to be selected in which all annotations are described. An xml file is created for every original image.
- XML per Image: One xml file is available for every original image. Copy the xml files to the indicated directory.
Digital Elevation Model: Oblique only
Import Digital Elevation Model
- Estimated local ground height: Enter the estimated height of the local ground. This parameter will be used as default ground height for displaying the oblique imagery where there is no DEM coverage.
- Missing sample value: Insert the missing sample value (background value) of the DEM file.
- Choose file: Choose the DEM raster file. When clicking the “Open” button the DEM will be processed.
To overwrite the DEM file just choose the correct DEM file again. DEM is used to calculate image footprints so in case the DEM is overwritten it is recommended to reprocess footprints.
Metadata
Open the metadata properties window of the mapping resource to autofill or complete the metadata.
Reprocess
Update the envelope and the simplified trajectory according to the current photo positions, trajectory and pointcloud.