For documentation on the current version, please check Knowledge Base.
Clearance Checker
This page describes the Orbit desktop extension “Clearance Checker”.
Feature Extraction Pro
![]() Main Toolbar > Extensions > Clearance Checker
Main Toolbar > Extensions > Clearance Checker

Concepts
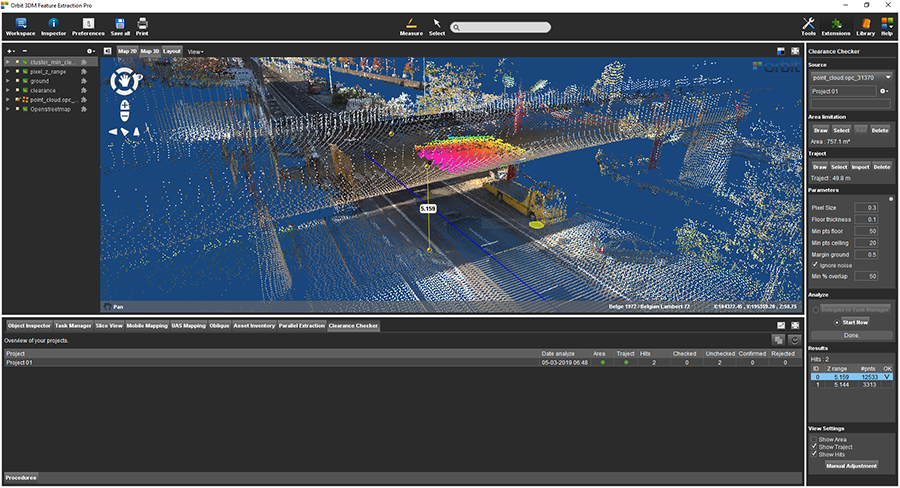
Clearance checker extension derives the minimum clearance of overhanging objects or constructions above road surface.
Point Cloud Resource
Clearance Checker analyzes single Point Cloud Dataset and is organized into Clearance Checker Projects.
Point Cloud Resources must be optimized into an Orbit Point Cloud. If needed merge and optimize multiple Point Cloud Resources into a single Resource, see Orbit Point Cloud and Optimize Data.
File Management
Clearance Checker Projects and associated files, like configurations, input and results, are stored and organized by Project next to the Point Cloud Resource file : ''<Point Cloud Resource File>.clearance_checker/<Clearance Checker Project>.
Clearance Checker tab
In Clearance Checker all Clearance Projects are shown. Standard operations like detaching and maximizing tab are available.
Sidebar

Source
Select Point cloud Dataset
From drop-down menu of all available *.opc files in the Dataset List choose one point cloud to use for Clearance calculation.
File menu drop-down
Choose where you want to store the Clearance Checker results. A project represents an automatically created destination folder next to point cloud folder.
For each Clearance Checker run a new project will be created. Writing new data in an existing project will overwrite existing data in that folder.
Options to create a new project, open a recent project, close or delete a project are available.
Area Limitation
The Area of Interest (AOI) must be defined by
- Selecting polygons from opened vector dataset.
- Drawing a polygon in 2D or 3D Map.
The area of the AOI will be displayed.
Delete will remove current Area Limitation definition.
Traject
There are several possibilities to define the 3D Path:
- Draw - draw a new path in Map 2D/3D. To edit vertexes of a Path Click 'Draw' again. Stop - finish the drawing of the path.
- Select - select an existing vector as your path.
- Import - import 3D Path from line vector file.
The length of the path will be displayed.
It is advised to draw a new path on Map 3D, due to the impossibility of controlling the Z value of your Path if you draw it on Map 2D.
Delete will remove current 3D Path definition.
Parameters
Define parameters for the detection:
- Pixel Size: to calculate clearance DEMs will be created on the 'floor' and 'ceiling' levels; pixel size defines grid size of the DEMs created.
- Floor thickness: expected thickness of the road layer.
- Min pts floor and Min pts ceiling: minimum number of points to define floor/ceiling surface; if less number of points is found the surface will be disregarded from clearance calculation.
- Margin ground: allows to exclude objects like lane divider from calculations.
- Ignore noise: enable ignoring noise in Clearance calculation.
- Min % overlap: part of the lane which should be cleared with calculated Clearance (in %).
Advanced Parameters
Advanced set of parameters is opened by small grey button in the right upper corner of the Parameters section.
- Default value: default value of clearance, if no overhanging constructions are found the Default value will be used for the clearance.omi raster created.
Analyze
Delegate to Task Manager
Allows to schedule job to be run later by delegating it to the Task Manager.
Start Now
Start calculating of the Clearances immediately.
Results
- Z range: value of the clearance
- #pnts: number of points defining the ceiling of the clearance
- OK: Flag on for checked points.
View Settings
Tools to customize the visualization.
By enabling them it is possible to visualize the Hits, traject and Area Limits.