For documentation on the current version, please check Knowledge Base.
Orbit 3DM Plugin for QGIS
This page describes the Orbit 3D Mapping Plugin for QGIS.
Download and Install
Requirements
See Requirements for Orbit 3D Mapping Viewer and Plugins.
Download
Download the Orbit Plugin installation executable from the Orbit website, https://orbitgt.com/3dm-plugin/.
Run the orbit-3dm-plugin-qgis-1940-win.exe file and follow the steps of the wizard to save the installation package (.zip file) on your machine.
Install Orbit Plugin
- Start QGIS
- Open QGIS Plugin Manager.
- Choose “Install from ZIP”, select the downloaded .zip file and click the “Install Plugin” button.
- Accept the “Security Warning: Continue?” pop-up confirmation.
- The “Plugin installed successfully” pop-up confirmation appears, the Orbit toolbar is added.
Install Phyton WebSockets
The Orbit Plugin requires the installation of Python's WebSockets package.
At first use of the Orbit Plugin, accept the “The 3D Mapping plugin needs to install some additional software” pop-up confirmation.
If QGIS is installed on “C:\Program Files\” additional steps might be required to install the Phyton's WebSockets package.
Complete the actions as suggested in the pop-up notification and run the “Install_plugins” batch file as administrator.
Orbit 3D Mapping Toolbar for QGIS
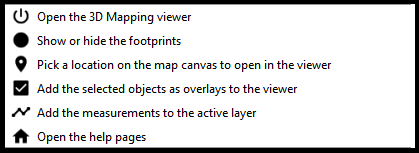
Open the 3D Mapping Viewer
When launching the Orbit 3D Mapping Viewer from the toolbar in QGIS, a new tab will be opened in the default browser of the user. If there is no window active yet in that browser, than a new window will be launched. The new window shows the 3D Mapping Viewer Welcome page.
On opening a publication or viewer, the Footprints of the opened resources and Field of Views are made visible in QGIS and are updated when they are changed in the 3D Mapping Viewer.
Show or hide the footprints
Option to disable the visibility of Orbit layers (Footprints, Field of Views and Measurements) in QGIS.
The layers can also be made invisible separately in the QGIS workspace by unchecking the box next to the layer name in the layer list.
Pick a location in the map canvas to open the viewer
Pick a location on the map canvas in QGIS to refocus all opened Views and the Reference View in the Orbit 3D Mapping Viewer to the chosen location.
Add the selected objects as overlays to the viewer
This option gives the possibility to visualize features from an external layer on the 3D Mapping Viewer. The features are visualized in the 3D Mapping Viewer using the formatting from QGIS. And a new resource is added to the Resources Sidebar.
Steps to be followed:
- Select one or more features in the active layer in QGIS from which the overlay should be made.
- Click the button to visualize the selected features as overlay on the Orbit 3D Mapping Viewer.
- Add new features to the existing overlay: Make a new selection in QGIS (from the same layer or another) and visualize them on the 3D Mapping Viewer. A combination of different layer types is possible.
- Clear the complete overlay: Click on the button in the toolbar without selecting any features in QGIS.
Add the measurements to the active layer
This option gives the possibility to save measurements from the Orbit 3D Mapping Viewer in an existing external layer in QGIS.
Steps to be followed:
- Add a layer to QGIS
- Make the layer editable and make sure it's chosen as the active layer.
- Execute a measurement in the Orbit 3D Mapping Viewer. While measuring, the measurement object is visualized in QGIS as part of the 3D Mapping Measurements layer.
- Click the button in the QGIS plugin toolbar to add the measurement object to the active layer in QGIS. Note that this is only possible if the layer type (Point, Line, Polygon) is the same as the measurement object.
Open the help pages
Orbit Knowledge Base is opened.