For documentation on the current version, please check Knowledge Base.
Optimize Imagery of Mapping Run\Oblique Project
This page describes the desktop procedure “Optimize Imagery”1) for Mobile Mapping, Oblique Project and UAS Mapping.
Blur and Erase QC, Content Manager, Feature Extraction, Publisher Catalog
![]() 1. Open Run\Oblique Project: Manage Mobile Mapping Runs
1. Open Run\Oblique Project: Manage Mobile Mapping Runs
2. Open Optimize Imagery procedure
 Procedures > Administration > Mobile Mapping > Optimize Imagery
 Procedures > Administration > Uas Mapping > Optimize Imagery
 Procedures > Administration > Oblique > Optimize Imagery
Cloud Upload Tool
![]() Top Toolbar > Import > Mobile Mapping > Optimize Imagery
Top Toolbar > Import > Mobile Mapping > Optimize Imagery
Concepts
The procedure “Optimize Imagery” makes it possible to :
- Optimize all Original Images of the Opened Run into Processed Images.
- Create for each group of Planar Images of the Opened Run a single Spherical Reference Image.
Concepts about Processed Images
Open Original or Processed Images
When opening an image from a Mapping Resource, the processed image will be used automatically if available. If no processed image is available, the original image will be opened.
Advantages of Processed Images
Use of Processed Images is optional in all Orbit products except for Orbit 3D Mapping HTML5 Web Viewer, but highly recommended to improve performance :
- At all time for Orbit 3DM Publisher.
- When using uncompressed Original Images for Orbit Desktop.
Use of Processed Images has following advantages :
- Significant reduced CPU requirement for Publisher Server.
- More efficient transfer and display of full resolution Image for Publisher WebClients.
However jpg quality can be set to apply compression (for Mobile Mapping and UAS Runs), Processed Images are not optimized to reduce file size. If the same jpg quality is used for both Original and Processed Images, then the file size will increase by ~30%.
If a Processed Image is available, the Original Image is no longer used and can be deleted.
Requirements to optimize images
To optimize Original Images into Processed Images, these are the requirements :
- An Original Run of Version 2 or newer, see Orbit Mapping Resources - Structure and Configs.
- Local file access to Original Images. Online Original Images cannot be used. Use of link.ini image reference file is supported.
Concepts about Spherical Reference Image
Advantages
A Spherical Reference Image combines the ease of use of a Spherical Images and the accuracy of a Planar Images.
One can easily navigate from one Planar Image Group to another nearby recording position and open one of the available high resolution and accurate Planar Images.
Requirements
Create Spherical Reference Image requires :
- An Original Run of Version 3 or newer, see Orbit Mapping Resources - Structure and Configs.
- Local file access to Original Images.
- Planar Image Group Identifier for each recording position, stored in photo position “OrbitPhotoGroupId” attribute.
- Import Template addon “panorama_planargroups”.
Provide an Orbit Mapping Run to Orbit Support to receive the required template addon.
Procedure
For Oblique Projects they are hard-coded and can't be changed through the Optimize Procedure. For UAS and Oblique Imagery (except for data acquired with Vision Map camera) also Convert tool can be used instead of Optimize Procedure.

Optimize
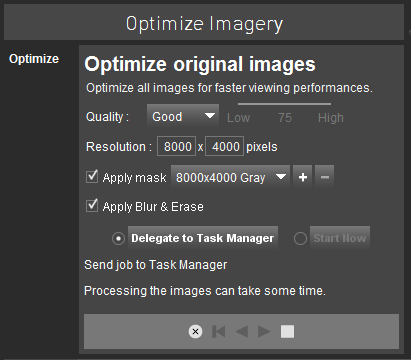
Optimize all Original Images of the Opened Run into Processed Images.
Quality
Set jpg compression quality for the processed images.
Select one of the preset values or use “Custom” to set any quality value via the slider below.
Higher quality will increase the file size and the corresponding time to load the image.
There is no point to process the images with a higher quality than the original image files. For most use cases jpg quality 80 “Good” will be ok.
More information about the effect of jpg quality and compression : https://en.wikipedia.org/wiki/JPEG.
Resolution
Set image size in pixels.
the software automatically detects the size of the original images.It is advised to keep the original settings, only if you have huge images(over 10000×5000)it is reasonable to downsize them. The ratio should always be kept as it is.
Mask
Optionally a mask file can be applied on top of the original images to hide unwanted structures e.g. GPS antenna while processing the optimized images.
It is possible to use a default mask provided by Orbit or to add a customized one. A mask must be created in .png format with the same resolution as the original images. The area which corresponds with the unwanted structures must be covered by a polygon filled with a solid color and transparent background on the remaining part of the image.
The images must be located in the original folder. After the Optimize Imagery procedure the new .omi images will be stored in the newly created processed folder.
If not all the images are optimized after the end of the procedure, it might be necessary to run the process a second time.
Once a mask is chosen and the procedure has started, all the processed .omi files will contain the mask.
Optimize Imagery does not overwrite previously processed images, therefore the previously processed images that were created must be deleted.
Blur & Erase
Set option to apply blurred and erased registered areas.
Optionally activate blurring to be applied on top of the processed images.
Blur and erase areas can be registered using the Orbit extension Blur and Erase extension, see www.orbitgt.com/content/mobile-mapping.
Process
Delegate job to Task Manager or start processing now.
CPU and Memory requirements
Optimize image process is multi-threaded and uses all available CPU and Memory resources. This process reduces your computer performance and affects/is affected by other running processes.
We strongly recommend to isolate this process, for example running over night, to avoid any cpu or memory issues.
Stop and Restart Processing
All images of the currently opened run will be processed.
This process can be interrupted at all time. Already Processed Images are retained and this job can be restarted to process remaining Original Images at all time.
To re-process already Processed Images the appropriated Processed Images need to be removed from the Orbit Run :
<Orbit Run>/<camera>/processed
Processing Time
Some stats and facts of processing images
Example image processing 123,787 images/ 59 hours 27 minutes, 2082 images/hour, 34.7 images/minute
- 64bit, Quad core, 16GB memory, Intel core i7
- read from external USB3 connected hard disk
- write to internal SSD drive
- original images : 8000×4000 pixels, jpg quality 80, average size of 4.25 MB/image,
- processed images : same resolution and quality, average size of 5.31 MB/image
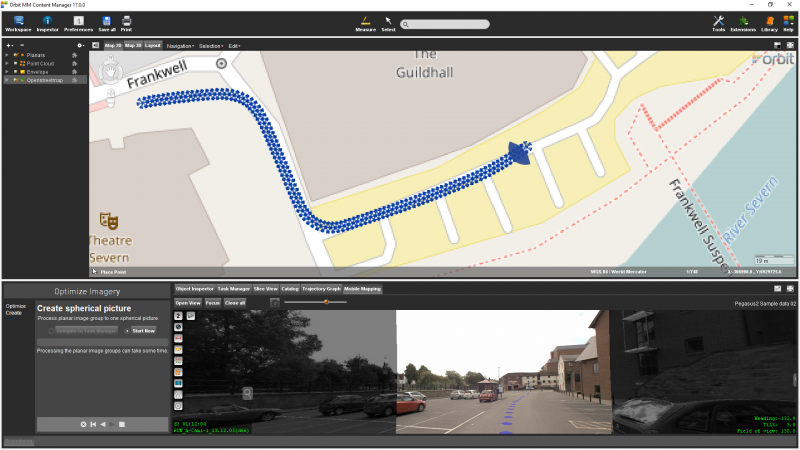
Create
Create for each group of Planar Images of the Opened Run a single Spherical Reference Image.

If the above described requirements are fulfilled the second procedure step “Create” will be added automatically.
Delegate job to Task Manager or start processing now.
At the moment do not cancel or interrupt the process.