For documentation on the current version, please check Knowledge Base.
Blur Registration
Blur and Erase Production
![]() Main Toolbar > Extensions > Blur Registration
Main Toolbar > Extensions > Blur Registration
This page describes how use the extension “Blur Registration” in the Orbit desktop.
As the name says, “Blur Registration” extension makes it possible to blur or to erase parts of the imagery, in order to hide unwanted elements. It can be used to hide car plate numbers or people faces. The extension is designed to allow very fast processing. For example, in an optimal environment, it is possible to process around 600 images per hour.
The Orbit desktop product Blur and Erase Production does not include the administration procedure “Import Run”. In order to be able to blur and erase imagery, the user must have a run previously imported or created by another Orbit product.
Concepts
Blur
Make a part or several parts of an image indistinct, unclear and hazy by reducing the edge content and making the transition form one color to the other very smooth.
Erase
Delete a part or several parts of an image by changing the pixels in that area to a different color.
Files & folders
As a result of using the extension, .xml files containing the definition of the blurred areas are created. These files are saved in the same location as the input imagery.
Sidebar
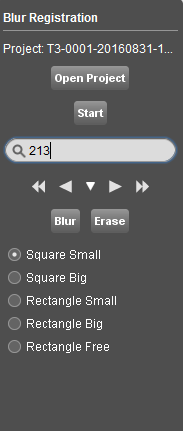
Open Project
Choose the run to process.
Start
Srart the procedure, starting with the first image. Simply find the locations to blur, and create the blurring areas by pointing the cursor to the desired locations.
Search Box
Search for a particular image, by using the name or a part of the name, inside the opened run folder structure. The result of the search will be displayed on the Map.
Navigation Tools
Tools to navigate through the imagery, by going to previous, next, first or last imagery.
Blur
Draw a polygon around the area to be blurred, directly on the MM Views.
Erase
Draw a polygon around the area to be erased, directly on the MM Views.
View settings
Choose the shape of the blurring cursor, several options are available. It is also possible to customize the size of the cursor and the keyboard shortcuts.
- File :
<install_folder>/program/services/ext_blur_registration/properties.ini
Workflow
- Choose the project
- Start the procedure ( choose to blur or erase part of the imagery)
- Choose the cursor shape
- Roam through the images and find the ones that need processing
- Find areas that need to be blurred, like car plates or faces