For documentation on the current version, please check Knowledge Base.
Post Collection Calibration
This page describes how to use the extension “Post Colection Calibration” in the Orbit desktop.
If point cloud and imagery don't match perfect and the exact camera calibrations (lever arms and delta heading/pan, tilt/pitch and roll) are not known, Orbit is able to calculate these camera calibration values. The “Post Colection Calibration” extension makes possible to refine the initial data calibration. It is available for : Orbit MM Content Manager
The extension can be used only to solve a misalignment caused by a continuous shift in the data, not a time related shift. The post collection calibration tool can solve only the fix offset between camera sensor position & orientation and the reference frame position & orientation imported as photo positions and orientations.
![]() Main Toolbar > Extensions > Post Collection Calibration
Main Toolbar > Extensions > Post Collection Calibration
Concepts
Image Positions and Orientations
In order for an image to be displayed correctly, the position and orientation of the sensor at the moment of exposure must be known.The calibration process finds the correct position and orientation parameters if they are unknown or incorrect. Read more about this topic in: Image Positions and Orientations
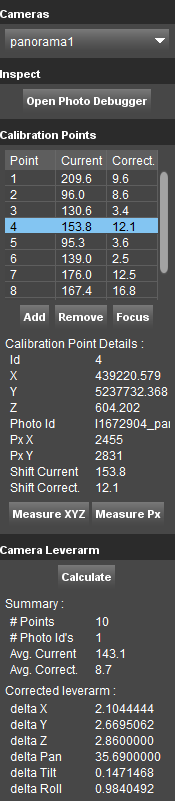
Calibration Points
The calibration points are features that can be readily and clearly identified on both imagery and pointcloud.
Sidebar
Cameras
Choose camera
Choose the camera to calibrate. A folder “calibration” must exist in the “<run_structure/panorama/import” folder for the option to be available.
Inspect
The inspect “Photo Debugger” tool offers the possibility to approximate the corrections needed to calibrate an image.
Photo Debugger
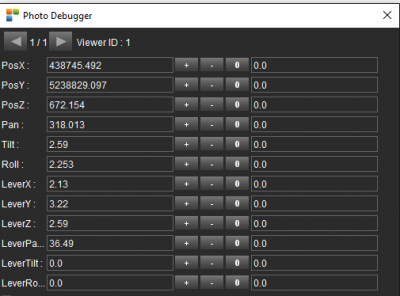
- First row: play trough the opened images and choose the one to debugg
- Left column: the parameter to adjust
- Second column: parameter's value (initial value according to the import template, or adjusted value if any adjustments have been performed)
- + icon: press to increase the value of the parameter
- - icon: press to decrease the value of the parameter
- 0 icon: press to return to the initial import value
- Right column: the value of the adjustment
Note: Press shift to change the magnitude of the adjustments
Calibration points
Table
The table shows all added calibration points, with the current difference in number of pixels and after aplying the corrections the remaining difference
Add
Add a new calibration point.
Remove
Remove a calibration point.
Focus
Focus the image on the selected point.
Calibration Points Details
Shows detailed information about the selected point.
Measure XYZ
Press to measure a point on the pointcloud.
Measure Px
Press to measure the same point on the imagery.
Camera Leverarm
Calculate
Press to calculate the new calibration parameters based on the measured points.
Summary
Gives an overview of the adjustments.
Corrected leverarm
The result of the Post Calibration - the calculated corrections to apply to the photopositions in order to better calibrate the data.
Post Collection calibration Workflow
- If needed customize your template to take into account any initial lever arms values you may have. See more: MM Data Preparation and Import Templates
- Import the run. See more: Import Mapping Run
- If the data is not perfectly aligned open the Post Collection Calibration extension
- Choose the camera to calibrate
- Use the Photo Debugger to find approximate corrections that are producing a good visual alignment on several images. Use images well distributed along the run.
- Use this new found values to modify accordingly the import template and re-import the photopôsitions using the Edit Run procedure, see: Manage Mobile Mapping Runs
- On the re-imported run start measuring Calibration Points. At least 16 calibration points using 4 or more reference images are required to make a good calibration possible. It is advised to have a well-distributed set of points along the run and on the image. Calibration points in all quadrants are a must.
- Calculate the corrections
- Apply the new found values to the Import Template. The new lever arms values ( delta values) must be entered in the import_locations.ord file found in the run structure under the panorama1/import folder. The OrbitCameraDelta attributes values must be updated using the values found using the Post Collection Calibration extension
- Re-import the photopositions using the Edit Run procedure. During re-import the position and orientation of the images will be updated, taking in consideration the new lever arms.