For documentation on the current version, please check Knowledge Base.
Panorama Component
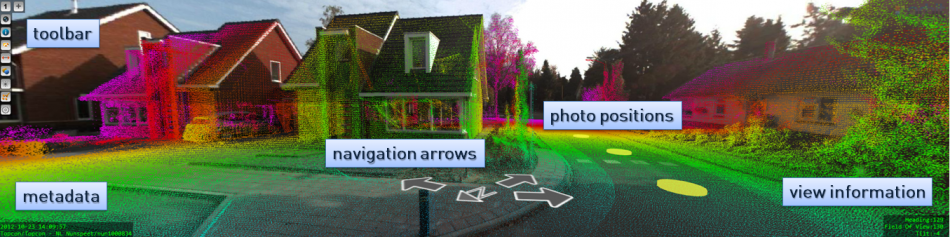
Toolbar
The Mobile Mapping Photo View Toolbar contains the following functions:
 Image reference number. Image reference number.  Close image. (cursor above image reference number) Close image. (cursor above image reference number)  Add view by clicking a location on the map. Add view by clicking a location on the map. Make a snapshot of the current image. Make a snapshot of the current image.  Show metadata of the current open images and of the selected objects. Show metadata of the current open images and of the selected objects.  Manage the vector overlays on the map and on the images. Manage the vector overlays on the map and on the images.
|
 Measure in panorama images. Measure in panorama images.  Manage the mobile mapping projects. Manage the mobile mapping projects.  Adjust the image brightness of all open images. Adjust the image brightness of all open images. Show / Hide the point cloud on the images. Show / Hide the point cloud on the images.  Change the setting for the current session. Change the setting for the current session. |
Navigation arrow and photo positions
The navigation arrows and photo positions that are show on the images give you the possibility to navigate to a nearby panorama image.
Inside the panorama component the photo positions and navigation arrows are hotspots where you can click on. Hoovering the mouse above a hotspot the cursor will change into a hand pointer. This means the hotspot is clickable.
Check the page “Navigation, Open and Close Photo Views” for a complete overview of all navigation functions within the panoramas:
- Zoom and pan
- Open view from map component
- Open views from panorama component
- Close view
Vector overlays
Show vector overlays
In the vector overlays panel (see Photo View Toolbar > Vector overlays) it is possible to show or hide available vector overlays.
Metadata
The timestamp and photoID are shown in the lower left corner of the images. You can hide the metadata via the “Settings” panel.
View information
The information of the current orientation of each view is displayed in the lower right corner of the view:
- Heading : Orientation for the center of the image (north = 0).
- Tilt : deviation from horizontal view in DEG.
- Field of View : Width of the viewing angle in DEG.
You can hide the view information via the “Settings” panel.