For documentation on the current version, please check Knowledge Base.

Fiducial Mark Measurement
What are Fiducial Marks?
The fiducial marks are marks on the edges of the camera field. They define the camera coordinate system by means of their coordinate values found on the camera calibration certificate. The amount and the position of the fiducial marks depends on the camera type or camera manufacturer. These marks have to be measured on each image in order to create an internal orientation defining the transformation between the image file coordinate system and the camera coordinate system.
The Fiducial marks dialog

When you choose the 'Manual' option you can either continue with the next wizard step in the process of creating a Strabo project or continue with the manual measurement of the fiducial marks below. Selecting one of the two other options will prevent you to go to the next wizard step without executing the selected option.
Map of the fiducial marks
On the Camera calibration sheet, you will find a figure telling you how the fiducial marks are numbered relative to each other and possibly relative to an instrument panel in the camera. This will be different for each camera manufacturer.
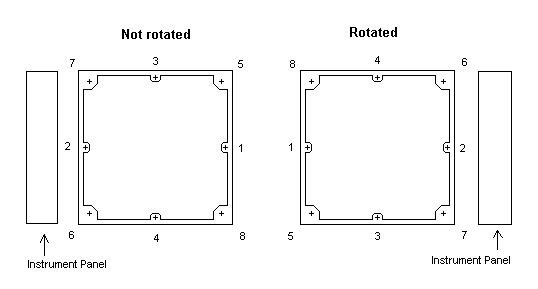
Above you see a view on the location of the fiducial marks as it is defined in Strabo. The problem is to define how the camera's definition of the fiducial marks in the calibration sheet corresponds to the definition of fiducial marks in Strabo. Strabo makes the assumption that the camera, displayed above as 'Not Rotated', corresponds to the situation when the camera is placed in the airplane flying from left to right, flying from 2 in the direction of 1. When an airplane makes a flight in the inverse direction against the first strip, the image has to be rotated to be viewed nicely together with the first strip. Strabo will decide that the image has to be rotated in function of the flight direction of the strip, normally this is in function of 'kappa'.
The numbering of the fiducial marks in a 'Not Rotated' image is the same as in the Camera dialog:
- Middle Right → 1
- Middle Left → 2
- Middle Top → 3
- Middle Bottom → 4
- Top Right → 5
- Bottom Left → 6
- Top Left → 7
- Bottom Right → 8
'Not rotated' and 'Rotated'?
When starting a Strabo Project, the application will calculate the strip orientation based on the available kappa values. This results in a value for the main orientation of the strips. All the images that have a kappa value in the same direction as the main strip-orientation, will be marked as 'Not rotated'. It is possible that there are strips found having the opposite direction of the main strip-orientation. These images will be marked as 'Rotated'. This explains also the different (rotated) numbering of the fiducial marks in the image above.
You will find these parameters also in the header of the different Image Detail Windows. Not rotated will be recognized as 'NR', Rotated as 'R'.
How to do the Interior Orientation manually?
After creating a project and it's camera definition, follow the next steps to manually measure the fiducial marks. There are two ways:
- Use the similar approach to open a 'Tiepoint' dialog as explained in 'Measuring Tiepoints'.
The 'Tiepoint dialogs' contains next to Tiepoint Measuring functions, also functions for measuring the Fiducial Marks. - Using the 'Fiducial Marks' dialog:
- Select the manual option.
- Press the button next to it 'Measurement'.
In both approaches a window like the following will be shown (showing here two Tiepoint Measurement windows):

Each 'Tiepoint window' shows the following information in the header:
- number of photograph (1355).
- number of fiducial marks measured (4-0).
- number of fiducial marks that has been measured more than once (4-0).
- In case of multiple measurements the average of the measurements will be calculated and used.
- index number of fiducial mark being measured at the moment (FM:0), the one that you have moved to lastly.
- the MSQE (Mean Square Error) off the fiducial mark measurements in micron (7.2)
- indication of photo rotation (R: rotated, NR: not rotated).
See 'Tiepoint Measurements' for more detailed description on 'New Image Point' and 'Edit Image Point'.
Specific 'Interior Orientation' Measurement Functions
Select this mouse button inside the 'Tiepoint Window' where you want to do the Interior Orientation. Press the right mouse button inside the 'Tiepoint Window' and the following popup menu will be shown:
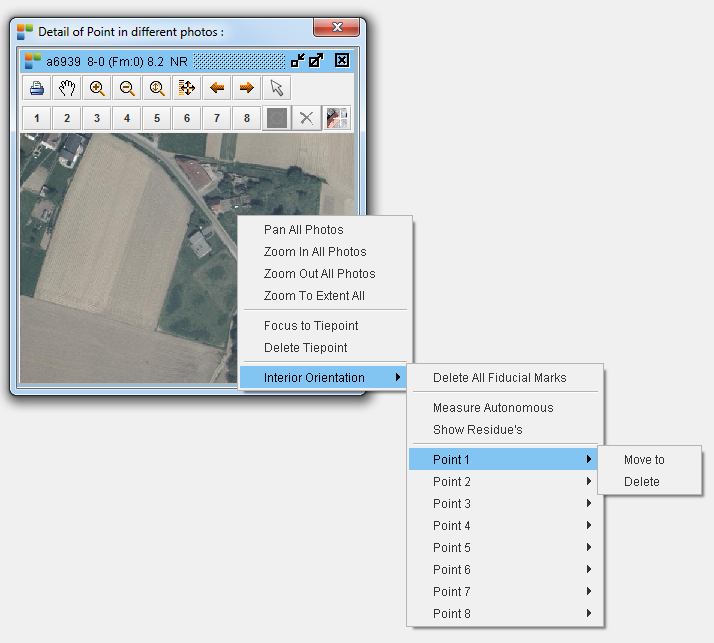
Select the 'Interior Orientation' submenu to view the different options related to the Interior Orientation.
The next functions are now available:
- Delete All Fiducial Marks
Deletes all the fiducial marks of this image. - Measure autonomous
This will start an automatic measurement of the fiducial marks using matching techniques.
The result can be evaluated immediately in the header. - Show Residues
Shows a dialog with the results of the transformation between image coordinate system defined by the fiducial mark measurements and camera coordinate system defined by the values obtained in the camera calibration certificate.

Specific 'Fiducial Mark' Functions
The next 8 functions are the same submenu for all the fiducial marks:
- Move
Move to one of the fiducial marks.
When no fiducial mark is measured yet, an approximate location will be used.
Therefore it is possible that you will not see at all a fiducial mark, for the first fiducial mark that you want to measure.
In that case use the pan and zoom buttons in the 'Tiepoint Window' to locate the position of the fiducial mark.
Press this icon and measure the fiducial mark as accurate as possible using the left mouse button.
- Delete
You can delete the measurement of this selected fiducial mark using the second function in the submenu: Delete.
Other Approaches to do an Interior Orientation in one image
Autonomous
Even in the'Tiepoint Windows' you can perform an autonomous measurement of the fiducial marks:
- Open an 'Tiepoint Window' for the required image as described above.
- Select 'Interior Orientation' in the submenu.
- Select the 'Delete All Fiducial Marks' function when appropriate.
- Select the 'Measure Autonomous' function.
- Check the results:
- In the header of the image detail dialog.
- Select the 'Show Residue's' function to see the adjustment results.
- Move to the individual Fiducial Marks.
Manual Measurement
- Select the proper mouse icon in the Strabo Application.
- Open the Tiepoint dialog for the required image.
- Select the 'Delete All Fiducial Marks' function when appropriate.
- Select 'Point 1' and 'Move' functions to view the first fiducial mark.
- Pan and zoom until the fiducial mark is visible in the centre of the image detail window.
- Measure the fiducial mark.
- Repeat steps 4, 5 and 6, for the remaining fiducial marks.
- Check the result.
- Remeasure if necessary.