For documentation on the current version, please check Knowledge Base.
Import Mobile Mapping data in Orbit
This page describes how to use the desktop mobile mapping administration procedure “Import Run”.
If you received an Orbit processed run, use the administration procedure “Add Run” for direct use, to append the run to your Orbit installation.
Import Run
![]() Open the procedure “Import Run”
Open the procedure “Import Run”
Procedures > Administration > Mobile Mapping > Import Run
The import procedure consists out of 2 consecutive wizards :
- Create a new Orbit Run
- Import data according the selected template
The steps in the import wizard depend on the selected import template.
Create Run
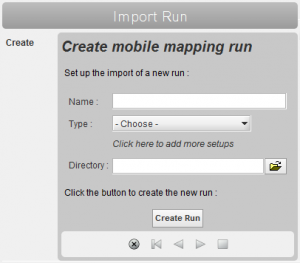
Name
Enter a name for the run.
Only letters, numbers, dashes - and underscores _ are accepted.
Special characters (like é # + & / * …) are not allowed and will be replaced automatically into an underscore _.
Setup (previously “Type”)
Choose your import template. Read more about templates and customized import confiugrations : Data Preparation and Import Templates
Directory
Browse and select the directory where the new run and data will be stored.
A new run sub-directory will be created to group all files and directories belonging to the run.
If an already processed Orbit run directory or sub-directory is selected, Orbit will recognize the run and will just open that run.
Considerations :
- While importing local resources (point clouds, imagery) Orbit will process the data into the Orbit Run folder. Be sure that there is enough disc-space and fast disc access to reduce the import process time.
- When using Orbit Mobile Mapping in Client Server special attention is required for data management, storage, file access, system file permissions and network connectivity : Manage Mobile Mapping in Client-Server.
Create Run
Click “Create Run” button to confirm.
The 2nd wizard to import the raw data will start automatically depending the selected template and type of mobile mapping data your are importing.
Import Trajectory
Use the “Choose File” button to browse and select the file containing the trajectory information.
The import will start automatically after selecting the file. If the import is successful, proceed to the next step.
A trajectory is optional. Even if your template includes the import of a trajectory, you may wish to this step.
Import Imagery
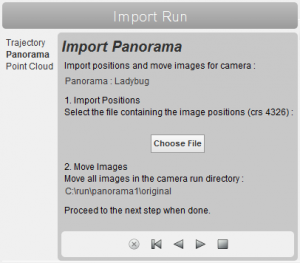
Import Positions
Use the “Choose File” button to browser and select the file containing the positions of the currently imported camera. The import will start automatically after selecting the file. If the import is successful, proceed to “Move Images”.
If the positions are already imported a new import will replace the previously imported positions.
Move Images
Move the image files to the indicated directory.
This will be a sub-directory “original” of the current camera directory within the newly created run.
Datastructure / CRS
This photo position file needs to be exactly as described by the used import template : data structure, column sequence, type of coordinates, coordinate reference system. If required contact your data supplier or Orbit administrator to adjust.
Import Point Cloud
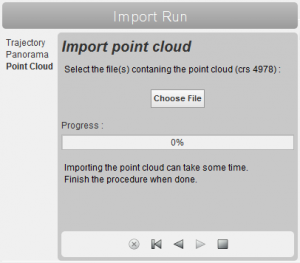
Import point cloud
Since update 10.4 Orbit processes a multi-resolution point cloud, read Orbit Point Cloud processing.
“Choose File”
Use the “Choose File” button to browse and select the file(s) containing the point cloud information.
Use the Ctrl and Shift to select multiple point cloud files to be imported together.
All selected files must be exactly as described by the selected import template.
“Update”
The “Update” button will only be enabled for runs without a multi-resolution point cloud.
Re-Import of Point Cloud
If a point cloud is already imported a new import will replace the previously imported point cloud with the same internal name :
- one resource file : Orbit internal name = file name
- two or more resources file : fix Orbit internal name.
A new import will always replace a previous multiple file import.
Datastructure / CRS
These point cloud files need to be exactly as described by the used import template : data structure, column sequence, type of coordinates, coordinate reference system.
If required contact your data supplier or Orbit administrator to adjust.
Finish
Because the point cloud import can take some time, it is the last step of the procedure. Start the point cloud processing if there is enough time to do so.
For example you can start the point cloud import just before leaving the office. Next day you can enjoy the results.
Since update 10.5 a newly imported point cloud is directly available.