For documentation on the current version, please check Knowledge Base.
How to use the "Orbit Blur Registration" tool
Start application and open project
- Launch the application “Orbit Client”
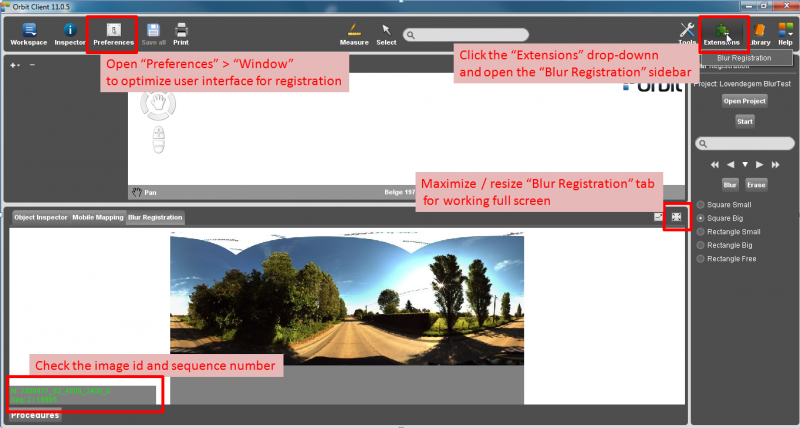
- Open the “Blur Registration” extension : Top Toolbar > Extensions drop-down > “Blur Registration”
- Open project : Browse and select the “<project name>.omr” file
Optimize user interface for registration
The blur registration tools are optimized to be used full screen on a single monitor. The “Blur Registration” tab should be maximized, the top toolbar hidden :
- Set the “Window” preference to hide Top Toolbar on maximizing the “Blur Registration” tab : Top Toolbar > Preferences > Window :
- Enable “Allow Frame Maximizing”
- Enable “Hide Top Toolbar”
- The advanced user can enable “Hide Sidebar” as well and use the keystrokes for all actions.
- Maximize “Blur Registration” tab : Click the maximize icon in the left upper corner of the “Blur Registration” tab.
- Only for the areas that are really close by, a free rectangle should be used.
Tools and Keystrokes
Open starting image
On opening the project the first image of the project will be opened automatically.
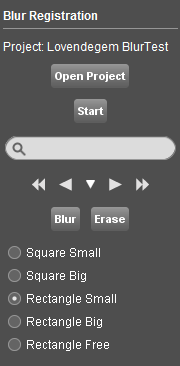
Use the “Start” button to load the first image that is not yet checked for blurring. Check the sequence number in the left lower corner of the image
Open next or previous image
Via keystrokes or using the according sidebar icons (<<, <, >, >>) its possible to go 1 or 5 images forward or backwards.
In production you only need to go forward. Every opened image is automatically flagged as checked for blurring even without defining any registration area.
One need to be extremely careful using the 5 forward function. All skipped images will be flagged as checked for blurring. This function should only be used in rural areas when you are sure next 25 meters nothing need to be blurred.
Switch registration type and register areas
The application provides 4 predefined registration areas which will be applied with a single click. Exceptional a free rectangular area can be defined by 2 clicks.
The preview of the currently active registration area is always shown in cyan together with the mouse pointer.
A registered area is displayed in green. To remove a registered area, hover above the area and click when the registered area is displayed in red.
Keystrokes
All required blur-actions are available via keystrokes. To optimize production a it is strongly advised to use these keystrokes. Keystrokes are available if the Orbit Client window is the active Windows application window.
It is strongly advised to use the numeric keypad with disabled NumLock.
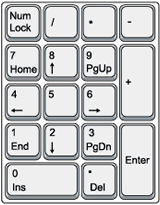
Activate specific blur zones
- Home : Square Small
- PgUp : Square Big
- End : Rectangle Small
- PgDn : Rectangle Big
- Insert : Rectangle Free
Open next or previous image
- Arrow right : Go to next image
- Arrow left : Go to previous image
- Arrow up : Go 5 images forward
- Arrow down : Go 5 images backwards